所有运行在线网环境的程序应该都被监控,对线网而言,无论是 Fatal error、E_NOTICE 还是 E_STRICT,都应该被消灭。对开发者而言,线网发生任何异常或潜在bug时,应该第一时间修复、优化,而不是等反馈之后才知道,然后临时去排查问题!
这篇文章要讲啥?
- 了解PHP错误机制
- 注册PHP的异常处理函数、错误处理函数、脚本退出函数
- 配置PHP预加载(重要)
- 搭建日志中心(ELK,ElasticSearch + Logstash + Kibana)
- 基于 ElasticSearch RESTful 实现告警
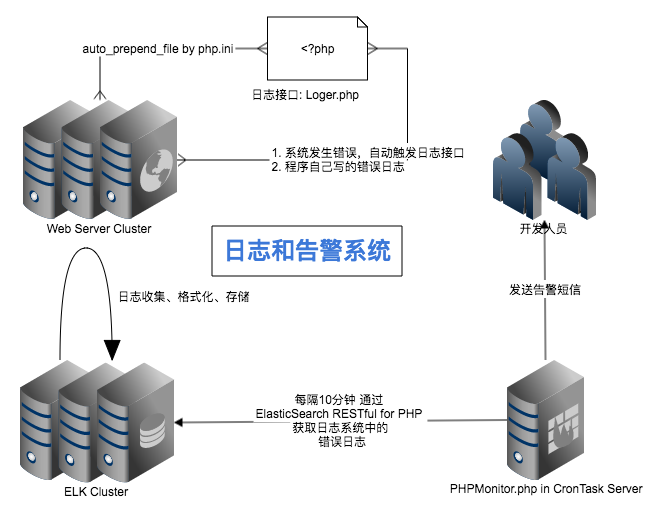
先看一张系统全局图

要达到的目的?
所有PHP程序里的错误或潜在错误(支持自定义)都全部写入日志并告警,包含错误的所在文件名、行号、函数(如果有)、错误信息等等
PHP程序不需要做任何修改或接入!
一、了解PHP错误机制
截止PHP7.1,PHP共有16个错误级别:
https://php.net/manual/zh/errorfunc.constants.php
如果你对PHP错误机制还不太了解,网上有很多关于PHP错误机制的总结,因为这个不是文章的重点,这里不再详细介绍!
二、注册PHP的异常处理函数、错误处理函数、脚本退出函数
PHP有三个很重要的注册回调函数的函数
- register_shutdown_function 注册PHP退出时的回调函数
- set_error_handler 注册错误处理函数
- set_exception_handler 注册异常处理函数
我们先定义一个日志处理类,专门用于写日志(也可以用于用户日志哦)
<?php
/**
 * 日志接口
 * @filename Loger.php
 * @since 2016-12-08 12:13:50
 * @author 979137.com
 * @version $Id$
 */
class Loger {

    // 日志目录,建议独立于Web目录,这个目录将作用于 Logstash 日志收集
    protected static $log_path = '/data/logs/';

    // 日志类型
    protected static $type = array('ERROR', 'INFO', 'WARN', 'CRITICAL');

    /**
     * 写入日志信息
     * @param mixed  $_msg  调试信息
     * @param string $_type 信息类型
     * @param string $file_prefix 日志文件名默认取当前日期,可以通过文件名前缀区分不同的业务
     * @param array  $trace TRACE信息,如果为空,则会从debug_backtrace里获取
     * @return bool
     */
    public static function write($_msg, $_type = 'info', $file_prefix = '', $trace = array()) {
        $_type = strtoupper($_type);
        $_msg  = is_string($_msg) ? $_msg : var_export($_msg, true);
        if (!in_array($_type, self::$type)) {
            return false;
        }
        $server = isset($_SERVER['SERVER_ADDR']) ? $_SERVER['SERVER_ADDR'] : '0.0.0.0';
        $remote = isset($_SERVER['REMOTE_ADDR']) ? $_SERVER['REMOTE_ADDR'] : '0.0.0.0';
        $method = isset($_SERVER['REQUEST_METHOD']) ? $_SERVER['REQUEST_METHOD'] : 'CLI';
        if (!is_array($trace) || empty($trace)) {
            $dtrace = debug_backtrace();
            $trace  = $dtrace[0];
            if (count($dtrace) == 1) {
                //不是在类或函数内调用
                $trace['function'] = '';
            } else {
                if ($dtrace[1]['function'] == '__callStatic') {
                    $trace['file'] = $dtrace[2]['file'];
                    $trace['line'] = $dtrace[2]['line'];
                    $trace['function'] = empty($dtrace[3]['function']) ? '' : $dtrace[3]['function'];
                } else {
                    $trace['function'] = $dtrace[1]['function'];
                }
            }
        }
        $ace = $trace;
        $now = date('Y-m-d H:i:s');
        $pre = "[{$now}][%s][{$ace['file']}][{$ace['line']}][{$ace['function']}][{$remote}][{$method}][{$server}]%s";
        $msg = sprintf($pre, $_type, $_msg);

        $filename = 'phplog_' . ($file_prefix ?: 'netbar') . '_' . date('Ymd') . '.log';
        $destination = self::$log_path . $filename;
        is_dir(self::$log_path) || mkdir(self::$log_path, 0777, true);
        //文件不存在,则创建文件并加入可写权限
        if (!file_exists($destination)) {
            touch($destination);
            chmod($destination, 0777);
        }
        return error_log($msg.PHP_EOL, 3, $destination) ?: false;
    }

    /**
     * 静态魔术调用
     * @param $method
     * @param $args
     * @return mixed
     *
     * @method void error($msg) static
     * @method void info($msg) static
     * @method void warn($msg) static
     */
    public static function __callStatic($method, $args) {
        $method = strtoupper($method);
        if (in_array($method, self::$type)) {
            $_msg = array_shift($args);
            return self::write($_msg, $method);
        }
        return false;
    }
}
接下来,再写一个系统处理类,定义回调函数和注册回调函数
<?php
/**
 * 注册系统处理函数
 * @filename Handler.php
 * @since 2016-12-08 12:13:50
 * @author 979137.com
 * @version $Id$
 */
class Handler {

    const LOG_FILE_PREFIX = 'handler';
    const LOG_TYPE = 'CRITICAL';

    /**
     * 函数注册
     * @return none
     */
    static public function set() {
        //注册致命错误处理方法
        register_shutdown_function(array(__CLASS__, 'fatalError'));
        //注册自定义错误处理方法
        set_error_handler(array(__CLASS__, 'appError'));
        //注册异常处理方法
        set_exception_handler(array(__CLASS__, 'appException'));
    }

    /**
     * 致命错误捕获,PHP错误级别预定义常量参考:
     * http://php.net/manual/zh/errorfunc.constants.php
     * @return none
     */
    static public function fatalError() {
        $error = error_get_last() ?: null;
        if (!is_null($error) && in_array($error['type'], array(E_ERROR, E_PARSE, E_CORE_ERROR, E_COMPILE_ERROR, E_USER_ERROR))) {
            $error['class'] = $error['function'] = '';
            Loger::write($error['message'], self::LOG_TYPE, self::LOG_FILE_PREFIX, $error);
            self::halt($error);
        }
    }
    /**
     * 自定义错误处理
     * @param int $errno 错误类型
     * @param string $errstr 错误信息
     * @param string $errfile 错误文件
     * @param int $errline 错误行数
     * @return void
     */
    static public function appError($errno, $errstr, $errfile, $errline) {
        $error['message'] = "[$errno] $errstr";
        $error['file'] = $errfile;
        $error['line'] = $errline;
        $error['class'] = $error['function'] = '';
        if (!in_array($errno, array(E_STRICT, E_DEPRECATED))) {
            Loger::write($error['message'], self::LOG_TYPE, self::LOG_FILE_PREFIX, $error);
            if (in_array($errno, array(E_ERROR, E_PARSE, E_CORE_ERROR, E_COMPILE_ERROR, E_USER_ERROR))) {
                self::halt($error);
            }
        }
    }

    /**
     * 自定义异常处理
     * @param mixed $e 异常对象
     * @return void
     */
    static public function appException($e) {
        $error = array();
        $error['message']  = $e->getMessage();
        $error['file'] = $e->getFile();
        $error['line'] = $e->getLine();
        $trace = $e->getTrace();
        if(empty($trace[0]['function']) && $trace[0]['function'] == 'exception') {
            $error['file'] = $trace[0]['file'];
            $error['line'] = $trace[0]['line'];
        }
        //$error['trace']  = $e->getTraceAsString();
        $error['function'] = $error['class'] = '';
        Loger::write($error['message'], self::LOG_TYPE, self::LOG_FILE_PREFIX, $error);
        self::halt($error);
    }

    /**
     * 错误输出
     * @param mixed $error 错误
     * @return void
     */
    static public function halt($error) {
        ob_get_contents() && ob_end_clean();
        $e = array();
        if (IS_DEBUG || IS_CLI) {
            //调试模式下输出错误信息
            $e = $error;
            if(IS_CLI){
                $e_message  = $e['message'].' in '.$e['file'].' on line '.$e['line'].PHP_EOL;
                if (isset($e['treace']) ) {
                    $e_message .= $e['trace'];
                }
                exit($e_message);
            }
        } else {
            //线网不显示错误信息,显示固定字符串,保护系统安全
            //TODO:比较友好的做法是重定向到一个漂亮的错误页面
            exit('Sorry, the system error');
        }
        // 包含异常页面模板
        $exceptionFile = __DIR__ . '/exception.tpl';
        include $exceptionFile;
        exit(0);
    }
}
二、自动加载脚本(auto_append_file)
以上两个脚本准备就绪以后,我们可以把它们合并到一个文件,并增加两个重要常量:
<?php
//是否CLI模式
define('IS_CLI', PHP_SAPI == 'cli' ? true : false);
//当前是否开发模式,用于区分线网和开发模式,默认false
//开发模式下,所有错误会打印出来。非开发模式下,不会打印到页面,但会记录日志
define('IS_DEBUG', isset($_SERVER['DEV_ENV']) ? true : false);
//注册系统处理函数
Handler::set();
假设合并后的文件名叫:auto_prepend_file.php
我们把这个文件进行预加载(即自动包含进所有PHP脚本)
这时候到了很重要的一步就是,就是配置 php.ini
auto_prepend_file = /your_path/auto_prepend_file.php
重启你的Web服务器如 Apache、Nginx
写一个测试脚本 test.php
<?php
var_dump($tencent);
因为 $tencent 未定义,所以这时候就会回调我们注册的函数,可以看到已经有错误日志了
php -f test.php
tail -f phplog_handler_20161209.log
[2016-12-09 16:01:05][CRITICAL][/data/logs/test.php][2][][0.0.0.0][CLI][0.0.0.0][8] Undefined variable: tencent
三、搭建日志中心(ELK,ElasticSearch + Logstash + Kibana)
因为我们的Web服务器一般都是分布式的,线网可能有N台服务器,我们的日志又是写本地,所以这时候就需要一个日志中心了,
日志系统目前已经有很多成熟的解决方案了,这里推荐 ELK 部署,
ElasticSearch,一个基于 Lucene 的搜索服务器,它提供了一个分布式多用户能力的全文搜索引擎,基于 RESTful 架构。
Logstash,分布式日志收集、分析、存储工具
Kibana,基于 ElasticSearch 的前端展示工具
因为网上已经很多 ELK 的搭建教程了,这里就不重复写了!
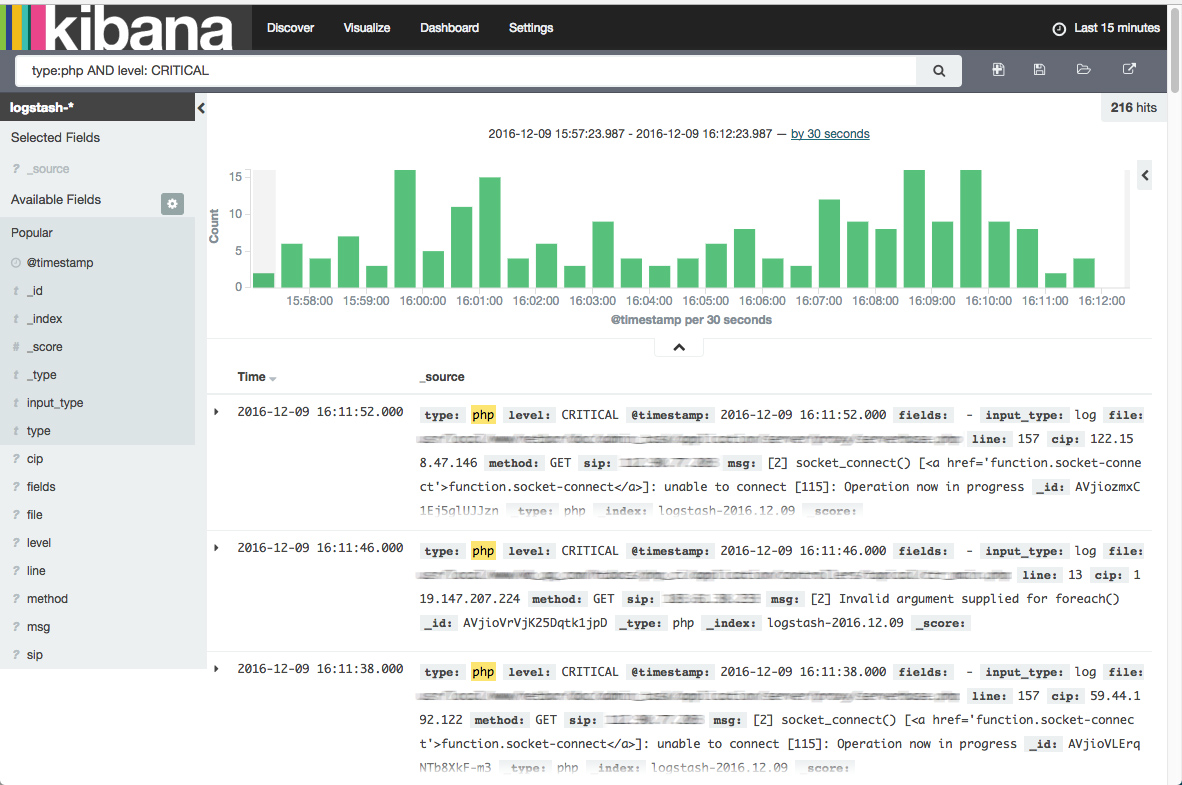
下面是一个基于ELK搭建好的日志中心,好不好用,用了就知道了!^_^

四、利用 ElasticSearch RESTful 实现告警功能
前面我们提到 ElasticSearch 是基于 RESTful 架构!
ElasticSearch 提供了非常多的接口,包括索引的增删改查,文档的增删改查,各种搜索
ElasticSearch官方提供了一个PHP版本的SDK:Elasticsearch-PHP
官方文档(全英文,目前没有中文版,看起来可能吃力,英文就英文吧,认真啃):
https://www.elastic.co/guide/en/elasticsearch/client/php-api/current/index.html
我们要做告警要用到的就是搜索接口!
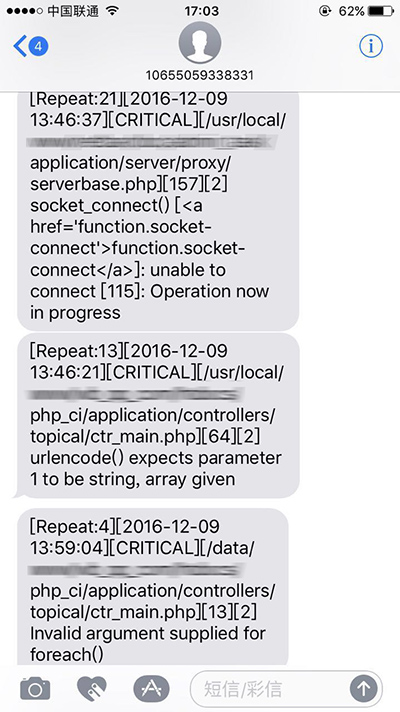
说白了,就是定时去把前面写的那些日志,全扫出来,然后告警给关系人!
Elasticsearch-PHP 安装很简单,通过 Composer 来安装,我这里以 1.0 为例子
1、编写一个 composer.json 文件
{
    "require": {
        "elasticsearch/elasticsearch": "~1.0"
    }
}
2、cd到你的项目里,下载安装包
curl -s http://getcomposer.org/installer | php
3、安装 Elasticsearch-PHP 及其依赖
php composer.phar install --no-dev
完事之后,就可以写告警脚本了!下面是我写的一个示例
<?php
//ElasticSearch Server,这是你的ELK服务器和端口
$es_server = array(
    '127.0.0.1:9200',
);

//接受告警人员
$alert_staff = array(
    'shiliangxie' => 18666665940,
    'xieshiliang' => 18600005940,
);

//需要告警的错误级别
$alert_level = array('ERROR', 'WARN', 'CRITICAL');

//告警周期,单位:分钟,这个需要和 cron 设置成一样的时间
$alert_cycle = 10;

###################################################################

//搜索最近 $alert_cycle 的错误日志
$q['index'] = 'logstash-'.date('Y.m.d');
$q['ignore_unavailable'] = true;
$q['type'] = 'php';
$q['size'] = 500;
$q['sort'] = array('@timestamp:desc');
$range_time['lte'] = sprintf('%.3f', microtime(true)) * 1000;
$range_time['gte'] = $range_time['lte'] - $alert_cycle * 60 * 1000;
$range = array('@timestamp' => $range_time);
$match = array('level' => implode(' OR ', $alert_level));
$q['body']['query']['filtered'] = array(
    'filter' => array('range' => $range),
    'query'  => array('match' => $match),
);
$params['hosts'] = $es_server;
require __DIR__.'/vendor/autoload.php';
$client = new Elasticsearch\Client($params);
$ret = $client->search($q);
$hit = $ret['hits']['hits'];
$hit = is_array($hit) && count($hit) ? $hit : array();

//组织告警内容
$alerts = array();
foreach($hit as $h) {
    $source = $h['_source'];
    $tag = md5($source['level'] . $source['file'] . $source['line']. $source['msg']);
    if (isset($alerts[$tag])) {
        $alerts[$tag]['num']++;
    } else {
        $alerts[$tag]['num'] = 1;
        $content = '[%s][%s][%s][%s]%s';
        $alerts[$tag]['content'] = sprintf($content, date('Y-m-d H:i:s', strtotime($source['@timestamp'])),
            $source['level'], $source['file'], $source['line'], $source['msg']
        );
    }
}
//var_dump($alerts);exit;
//发送告警
if (is_array($alerts) && count($alerts)) {
    array_walk($alerts, function($alert, $tag) use($alert_staff) {
        $msg = sprintf('[Repeat:%d]%s', $alert['num'], $alert['content']);
        array_map(function($mobile) use($msg) {
            return send_sms($mobile, $msg);
        }, $alert_staff);
        return ;
    });
}
然后我们把告警脚本加到 crontab 即可
*/10 * * * * /usr/local/bin/php /data/cron/PHPMonitor.php
坐等告警吧!

对于报警方案,目前市场上也有很多实现方案,如 Yelp 公司的 ElastAlert,用 Python 写的一个基于 ELK 用 Elasticsearch RESTful 报警框架

