Tagged: Apache

秒懂系列|Apache用户认证配置之Basic认证

很多时候我们可能需要对服务器资源进行保护,通常的做法是在应用层通过鉴权来实现,如果你嫌自己去实现鉴权太麻烦,那就直接让Apache去帮你实现吧!
Apache常见的用户认证可以分为下面三种:
- 基于IP,子网的访问控制(ACL)
- 基本用户验证(Basic Authentication)
- 消息摘要式身份验证(Digest Authentication)

基于IP的访问控制可以通过配置 Allow From实现!这里不多讲。
一般的,我们还会在IP的基础上,再增加一层 Basic Authentication,实现一个基本的服务器用户认证!

1、生成用户名密码文件

/usr/local/apache2/bin/htpasswd -bc users.pwd test hehe1234

Adding password for user test

/usr/local/apache2/bin/htpasswd -b users.pwd test2 hehe4321

Adding password for user test2

cat users.pwd

test:$apr1$4R3foyQ5$1KGHVA5HQL8M9b0K/2UWO0
test2:$apr1$pKLy86CD$W9hFUvs4F06OBXtQhCbPV/

可以看到用户名密码文件已经生成了,一行一个!

2、配置 VirtualHost,如:

<VirtualHost *:80>
    DocumentRoot /usr/local/www/pma/
    DirectoryIndex index.php index.html index.shtml
    ServerName pma.979137.com
    CustomLog "logs/pma.979137.com-access_log" common
    ErrorLog "logs/pma.979137.com-error_log"
    <Directory /usr/local/www/pma/>
        Options Includes FollowSymLinks
        AllowOverride AuthConfig
        AuthName "PMA Contents." 
        AuthType basic
        AuthUserFile /usr/local/apache/conf/users.pwd 
        Require valid-user
    </Directory>
</VirtualHost>
  • AllowOverride 表示通过配置文件进行身份验证
  • AuthName 发送给客户端报文头内容:WWW-Authenticate
  • AuthType 认证类型
  • AuthUserFile 这个就是刚刚生成的用户名密码文件
  • Require 指定哪些用户或组才能被授权访问。如:
    • require user test test2(只有用户 test 和 test2 可以访问)
    • requires groups managers (只有组 managers 中成员可以访问)
    • require valid-user (在 AuthUserFile 指定的文件中任何用户都可以访问)
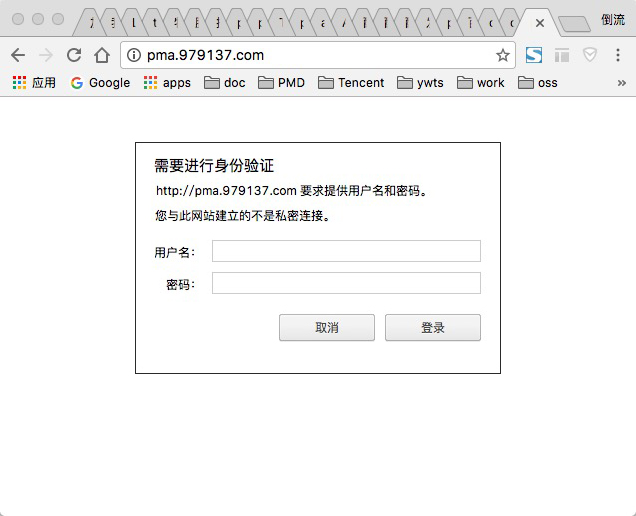
我们来看一下效果:

在浏览器访问:

cURL请求:

curl -v http://pma.979137.com/test.php

* Trying 10.223.28.1...
* Connected to pma.979137.com (10.223.28.1) port 80 (#0)
> GET /test.php HTTP/1.1
> Host: pma.979137.com
> User-Agent: curl/7.43.0
> Accept: */*>
< HTTP/1.1 401 Authorization Required < Date: Fri, 06 Jan 2017 07:02:15 GMT < Server: Apache/2.2.27 (Unix) PHP/5.3.29 < WWW-Authenticate: Basic realm=" PMA Contents." < Content-Length: 490 < Content-Type: text/html; charset=iso-8859-1 < >401 Authorization Required
>Authorization Required
This server could not verify that you
are authorized to access the document
requested. Either you supplied the wrong
credentials (e.g., bad password), or your
browser doesn't understand how to supply
the credentials required.

在没有携带用户名和密码时,HTTP Code 返回了 401,并输出了 Authorization Required!
表示需要该请求需要进行认证!

我们再来看下,携带密码请求:

curl -v -u 'test:hehe1234' 'http://pma.979137.com/test.php'

* Trying 10.223.28.1...
* Connected to pma.979137.com (10.223.28.1) port 80 (#0)
* Server auth using Basic with user 'test'
> GET /test.php HTTP/1.1
> Host: pma.979137.com
> Authorization: Basic c2hpbGlhbmd4aWU6YWl5aTEzMTQ=
> User-Agent: curl/7.43.0
> Accept: */*
>
< HTTP/1.1 200 OK < Date: Fri, 06 Jan 2017 07:14:14 GMT < Server: Apache/2.2.27 (Unix) PHP/5.3.29 < X-Powered-By: PHP/5.3.29 < Content-Length: 25 < Content-Type: text/html < string(11) "hello word!"

HTTP Code 已经是 200 了,并且返回了正确的内容!
至此,一个简单的 Basic 认证就OK了!这种认证一般可用于浏览器访问,也可以用于 API 认证!

秒懂系列|Apache和NGINX如何按天分割日志

默认情况下ApacheNGINX等web服务器,是没有帮我们按天分日志的,而是把所有日志放到一个文件,当流量大而日志多的时候,管理起来非常方便,一方面是内容多不易查找定位问题,另一方面文件也会越来越大,无效内容越来越多。
常规做法是把日志按天分割,网上很多通过 写脚本+定时任务 来做的,这其实有点多余,而且不好维护,Linux本身自带了很多日志处理程序,比如:logrotate ,它可以实现日志的自动滚动,日志归档等功能。
下面我们介绍使用 logrotate 实现
- Apache按天分割日志
- Nginx按天分割日志

Apache

Apache自身即成了 logrotate,一般在 /usr/local/apache2/bin/rotatelogs
先找到你的 rotatelogs 路径

locate rotatelogs

/usr/local/apache2/bin/rotatelogs

在你的 VirtualHost 模块添加或替换

<VirtualHost *:80>
    ......
    ErrorLog "| /usr/local/apache2/bin/rotatelogs /data/logs/apache/979137.com-error_log-%Y%m%d 86400 480"
    CustomLog "| /usr/local/apache2/bin/rotatelogs /data/logs/apache/979137.com-access_log-%Y%m%d 86400 480" common
</VirtualHost>

指定分割时间:86400 默认单位为s。也就是24小时
指定分区时差:480 默认单位m,也就是8小时

只保留30天日志,自动清理脚本:

#!/bin/bash

LOG_PATH_APACHE="/data/logs/apache/"
DAYS_AGO=date -d "-30 day" +%Y%m%d
\rm -rf ${LOG_PATH_APACHE}*log-${DAYS_AGO}

加入到crontab,每天执行一次即可

0 4 * * * /bin/bash /data/cron/clear_logs.sh > /dev/null 2&>1

NGINX

假设:
- 日志在 /data/logs/nginx/ 下面
- Nginx 安装在 /usr/local/nginx/

1、在 /etc/logrotate.d 目录下创建一个 Nginx 的配置文件 Nginx 配置内容如下

/data/logs/nginx/xxx.qq.com-access_log /data/logs/nginx/xxx.qq.com-error_log {
    su nobody nobody
    daily
    rotate 30
    notifempty
    sharedscripts
    postrotate
    if [ -f /usr/local/nginx/logs/nginx.pid ]; then
        /bin/kill -USR1 /bin/cat /usr/local/nginx/logs/nginx.pid
    fi
    endscript
}

配置解释:
1)配置需要分割的日志文件,也可以用 * 代替
2)su nobody nobody :一般我们的日志目录是允许所有用户进行写操作的,logrotate 认为这不是不安全的,这时 logrotate 会报错如下:

error: skipping "/data/logs/nginx/cafe.qq.com-error_log" because parent directory has insecure permissions (It's world writable or writable by group which is not "root") Set "su" directive in config file to tell logrotate which user/group should be used for rotation.

所以我们需要在配置里使用 su 切换身份执行
3)daily :日志文件每天进行滚动
4)rotate 30 :保留30天的日志
5)notifempty:日志文件为空不进行滚动
6)sharedscripts :运行postrotate脚本
9)/bin/kill -USR1 \/bin/cat /usr/local/nginx/logs/nginx.pid\ :Nginx平滑重启,也即让Nginx重新生成文件

2、执行logrotate

/usr/sbin/logrotate -f /etc/logrotate.d/nginx

如此,Nginx就会自动的按天产生日志了!

秒懂系列|Apache和NGINX退出自动重启

有时候,我们的Web服务器如Apache、NGINX可能因为某些原因退出了,这时候如果没有及时发现,就会影响服务,所以搞个自动重启是很有必要滴

Apache

#!/bin/sh
HTTPD_NUM=`ps aux | grep -P "(bin/httpd)|(./httpd)" | grep -v "vim" | grep -v "grep" | wc -l`
if [ ${HTTPD_NUM} -eq 0 ]; then
    /usr/local/apache/bin/apachectl restart
fi

Nginx

#!/bin/sh
NGINX_NUM=`ps aux | grep -P "nginx" | grep -v "vim" | grep -v "grep" | wc -l`
if [ ${NGINX_NUM} -eq 0 ]; then
    /usr/local/nginx/sbin/nginx
fi

加入crontab,每分钟检查一次

* * * * * /bin/bash /data/cron/apache_restart.sh > /dev/null 2 >& 1
* * * * * /bin/bash /data/cron/nginx_restart.sh > /dev/null 2 >&1

原理很简单,就是判断是否有进程,如果木有了,执行重启操作!

HTML也可以实现文件包含

我们知道,很多编程语言都有包含文件的功能,所以代码结构相对比较灵活,
但HTML作为一种文本标记语言,默认是不支持文件包含的!
但是,我们可以通过配置Web服务器让HTML支持文件包含!

SSI(Server Side Include),通常称为"服务器端嵌入"或者叫"服务器端包含",是一种类似ASP基于服务器的网页制作技术。
默认扩展名是 .stm、.shtm 和 .shtml
但我们常用的是是html,如果要在扩展名为 html 的文件使用SSI,就需要对 Apache 进行配置

以 Apache2.2 为例,编辑 httpd.conf,

1、搜索 AddType 和 AddOutputFilter,源码如下:

# Filters allow you to process content before it is sent to the client.
#
# To parse .shtml files for server-side includes (SSI):
# (You will also need to add "Includes" to the "Options" directive.)
#
# AddType text/html .shtml
# AddOutputFilter INCLUDES .shtml

默认是被注释的,需要去掉注释,修改成如下:

# Filters allow you to process content before it is sent to the client.
#
# To parse .shtml files for server-side includes (SSI):
# (You will also need to add "Includes" to the "Options" directive.)
#
AddType text/html .html .shtml
AddOutputFilter INCLUDES .html .shtml

2、搜索 Options Indexes FollowSymLinks 在后面加上 INCLUDES

注意,SSI 确实可以利用 Shell 来执行命令,这个功能是极度危险的,因为它会执行任何包含在 exec 标记中的命令。
如果用户有可能修改你的网页内容,那么你一定要关闭这个功能。
可以在 Options 指令中加上 IncludesNOEXEC 参数,以关闭 exec 功能,同时又保留 SSI。

<Directory /usr/local/www/979137.com>
    Options Includes FollowSymLinks
    AllowOverride None
</Directory>

3、重启Apache,可以使用 include 语法了,如:

<!--#include virtual="/header.html" -->

include 元素能按 file 属性或 virtual 属性判断应该包含的文件。
file 属性是一个相对于当前目录的文件路径,即不能是一个绝对路径(以"/"开头)或包含"../"的路径。
virtual 属性可能更有用,它是一个相对于被提供的文档的URL ,可以以"/"开头,但必须与被提供的文档位于同一服务器上。

Discuz在新浪云空间实现URL伪静态

新浪云SAE云空间在分布式基础上,几乎实现了普通虚拟主机全兼容的环境,但还是有一点点区别,比如URL Rewrite,新浪云空间实现URL Rewrite是通过在根目录编写一个 .appconfig 来实现的,同时在规则上也有一些区别

官方提供了一个原生 .htaccess 到 .appconfig 的转换工具:
http://htaccess.applinzi.com
我试了下 Discuz 的 Rewrite,转换后,发现没什么软用

RewriteEngine On
RewriteBase /
RewriteCond %{QUERY_STRING} ^(.*)$
RewriteRule ^/data1/www/htdocs/711//1/topic-(.+)\.html$ portal.php?mod=topic&topic=$1&%1
RewriteCond %{QUERY_STRING} ^(.*)$
RewriteRule ^/data1/www/htdocs/711//1/article-([0-9]+)-([0-9]+)\.html$ portal.php?mod=view&aid=$1&page=$2&%1
RewriteCond %{QUERY_STRING} ^(.*)$
RewriteRule ^/data1/www/htdocs/711//1/forum-(\w+)-([0-9]+)\.html$ forum.php?mod=forumdisplay&fid=$1&page=$2&%1
RewriteCond %{QUERY_STRING} ^(.*)$
RewriteRule ^/data1/www/htdocs/711//1/thread-([0-9]+)-([0-9]+)-([0-9]+)\.html$ forum.php?mod=viewthread&tid=$1&extra=page\%3D$3&page=$2&%1
RewriteCond %{QUERY_STRING} ^(.*)$
RewriteRule ^/data1/www/htdocs/711//1/group-([0-9]+)-([0-9]+)\.html$ forum.php?mod=group&fid=$1&page=$2&%1
RewriteCond %{QUERY_STRING} ^(.*)$
RewriteRule ^/data1/www/htdocs/711//1/space-(username|uid)-(.+)\.html$ home.php?mod=space&$1=$2&%1
RewriteCond %{QUERY_STRING} ^(.*)$
RewriteRule ^/data1/www/htdocs/711//1/blog-([0-9]+)-([0-9]+)\.html$ home.php?mod=space&uid=$1&do=blog&id=$2&%1
RewriteCond %{QUERY_STRING} ^(.*)$
RewriteRule ^/data1/www/htdocs/711//1/archiver/(fid|tid)-([0-9]+)\.html$ archiver/index.php?action=$1&value=$2&%1
RewriteCond %{QUERY_STRING} ^(.*)$
RewriteRule ^/data1/www/htdocs/711//1/([a-z]+[a-z0-9_]*)-([a-z0-9_\-]+)\.html$ plugin.php?id=$1:$2&%1[

下面是我改写的、亲测有效的 Rewrite 规则:

RewriteEngine On
RewriteBase /
RewriteCond %{QUERY_STRING} ^(.*)$
RewriteRule ^(.*)/topic-(.+)\.html$ portal.php?mod=topic&topic=$2&%1
RewriteCond %{QUERY_STRING} ^(.*)$
RewriteRule ^(.*)/article-([0-9]+)-([0-9]+)\.html$ portal.php?mod=view&aid=$2&page=$3&%1
RewriteCond %{QUERY_STRING} ^(.*)$
RewriteRule ^(.*)/forum-(\w+)-([0-9]+)\.html$ forum.php?mod=forumdisplay&fid=$2&page=$3&%1
RewriteCond %{QUERY_STRING} ^(.*)$
RewriteRule ^(.*)/thread-([0-9]+)-([0-9]+)-([0-9]+)\.html$ forum.php?mod=viewthread&tid=$2&extra=page\%3D$4&page=$3&%1
RewriteCond %{QUERY_STRING} ^(.*)$
RewriteRule ^(.*)/group-([0-9]+)-([0-9]+)\.html$ forum.php?mod=group&fid=$2&page=$3&%1
RewriteCond %{QUERY_STRING} ^(.*)$
RewriteRule ^(.*)/space-(username|uid)-(.+)\.html$ home.php?mod=space&$2=$3&%1
RewriteCond %{QUERY_STRING} ^(.*)$
RewriteRule ^(.*)/blog-([0-9]+)-([0-9]+)\.html$ home.php?mod=space&uid=$2&do=blog&id=$3&%1
RewriteCond %{QUERY_STRING} ^(.*)$
RewriteRule ^(.*)/(fid|tid)-([0-9]+)\.html$ index.php?action=$2&value=$3&%1
RewriteCond %{QUERY_STRING} ^(.*)$
RewriteRule ^(.*)/([a-z]+[a-z0-9_]*)-([a-z0-9_\-]+)\.html$ plugin.php?id=$2:$3&%1

全民https时代:如何免费获取SSL证书并部署到服务器

如今各大网站基本都披上了https,绿色的锁,看着好安全的样子,AppStore更是要求开发者必须使用https作为应用的服务器端接口协议。如今不上个https都没脸出来混?笔者思来想去,准备给自己的博客加个https,洋气一回

获得SSL证书:

免费的SSL证书有很多,这里推荐腾讯云,全球领先的云服务商,值得信赖!
腾讯云免费提供的证书是域名型免费版(DV)
首先进入腾讯云SSL产品页,点击购买,
https://cloud.tencent.com/product/ssl

选择免费版

输入域名和邮箱等信息

验证域名

下载证书

按照流程走完,就可以获得证书了!解压后可以获得支持多种Web服务器的证书

在服务器部署SSL功能(这里以NGINX为例)

server {
    listen  80; 
    listen  443 ssl;
    ...
    if ($server_port != 443) {
        rewrite (.*) https://$host$1 permanent;
    }
    # 证书包下Nginx目录内的crt文件路径,建议写绝对路径
    ssl_certificate  /home/www/hosts/979137.com.crt;
    # 证书包下Nginx目录内的key文件路径,建议写绝对路径
    ssl_certificate_key  /home/www/hosts/979137.com.key;
    ssl_session_timeout  5m;
    ssl_protocols SSLv2 SSLv3 TLSv1;
    ssl_ciphers ALL:!ADH:!EXPORT56:RC4+RSA:+HIGH:+MEDIUM:+LOW:+SSLv2:+EXP;
    ssl_prefer_server_ciphers on;
    ...
}

如果你希望你的网站同时支持http和https,把下面三行删掉就行!

if ($server_port != 443) {
    rewrite (.*) https://$host$1 permanent;
}

完成!重启NGINX,验证下,

very good !

Apache配置文件解析错误和启动失败总结

httpd not running, trying to start
(98)Address already in use: make_sock: could not bind to address 0.0.0.0:80
no listening sockets available, shutting down
Unable to open logs

80端口被占用,尚无可用套接字可以使用,导致apache关闭了。apache觉得,自己很没存在感,最爱的80端口被占用,连个可以说话的sokets都没有,于是apache很郁闷地选择了关闭。解决办法是,先把占用80端口的进程给揪出来,干掉它!

关于怎么找的问题:1.如果是windows平台,使用这条:netstat -aon|findstr "80",可以找到进程ID,直接杀掉;
2.如果linux平台,使用:lsof -i:80 ,看到pid没?不要犹豫,杀掉。
3.如果是unix,那像得网上再找办法啦··
-----

service httpd restart 再试试,看是不是能正常启动,Good Luck!


Invalid command 'Order', perhaps misspelled or defined by a module not included in the server configuration

这个错误是是没有加载 mod_authz_host.so 导致的,添加进去就行了
[code lang="shell"]LoadModule authz_host_module modules/mod_authz_host.so[/code]


Invalid command 'AddLanguage', perhaps misspelled or defined by a module not included in the server configuration


sudo apachectl restart

apache未启动,也没有报错,

等待更新....

LAMP三层独立架构部署

云厉的博客

考虑到复杂的应用环境,我们将Apache/PHP/MySQL三种服务独立配置不同主机

我们知道Apache与PHP有三种工作模式:

  • CGI
  • Modules
  • FastCGI

第一种现在用得很少了,性能差;对于动态页面全部由Apache进程启用PHP解释器,然后再释放
第二种需要到本地磁盘加载Modules模块,性能比第一种好,但还是会有很多消耗资源
第三种PHP是一个独立应用,通过网络套接字接口,接收Apache进程传过来的请求,所有PHP进程都由PHP自身管理
在PHP5.4以前,如果PHP需要连接mysql需要MySQL头文件等,
在php5.4以后就不需要了,直接使用

--with-mysql=mysqlnd --with-pdo-mysql=mysqlnd --with-mysqli=mysqlnd

由于Apache并不处理动态页面,所以前端用户请求的PHP页面需要转发到PHP服务器上,这里就需要对Apache做反向代理设置
当然了,我们在这里最好启用虚拟主机功能,这样方便管理。

编译安装Apache2.4.4

准备软件包:
apr-1.4.6.tar.gz
apr-util-1.4.1.tar.gz
httpd-2.4.4.tar.bz2
pcre-8.32.tar.gz

[root@station01 ~]# tar xf apr-1.4.6.tar.gz
[root@station01 ~]# cd apr-1.4.6
[root@station01 apr-1.4.6]# ./configure --prefix=/usr/local/apr
[root@station01 apr-1.4.6]# make &&make install
[root@station01 apr-1.4.6]# cd ..
[root@station01 ~]# tar xf apr-util-1.4.1.tar.gz
[root@station01 ~]# cd apr-util-1.4.1
[root@station01 apr-util-1.4.1]# ./configure --prefix=/usr/local/apr-util --with-apr=/usr/local/apr
[root@station01 apr-util-1.4.1]# make &&make install
[root@station01 apr-util-1.4.1]# cd
[root@station01 ~]# tar xf httpd-2.4.4.tar.bz2
[root@station01 ~]# cd httpd-2.4.4
[root@station01 httpd-2.4.4]# ./configure --prefix=/usr/local/apache --sysconfdir=/etc/httpd --enable-so --enable-ssl --enable-cgi --enable-rewrite --with-zlib --with-pcre=/usr/local/pcre --with-apr=/usr/local/apr --with-apr-util=/usr/local/apr-util --enable-modules=most --enable-mpms-shared=all --with-mpm=event
[root@station01 httpd-2.4.4]# make &&make install
[root@station01 httpd-2.4.4]# cp build/rpm/httpd.init /etc/init.d/httpd
[root@station01 httpd-2.4.4]# vim /etc/init.d/httpd
httpd=${HTTPD-/usr/local/apache/bin/httpd}
pidfile=${PIDFILE-/usr/local/apache/logs/${prog}.pid}
lockfile=${LOCKFILE-/var/lock/subsys/${prog}}
RETVAL=0
CONFFILE=/etc/httpd/httpd.conf
[root@station01 httpd-2.4.4]# chkconfig --add httpd
[root@station01 httpd-2.4.4]# chkconfig httpd on
[root@station01 httpd-2.4.4]# service httpd start

编译安装PHP5.4

准备软件包:
libmcrypt-2.5.7-5.el5.i386.rpm
libmcrypt-devel-2.5.7-5.el5.i386.rpm
php-5.4.13.tar.bz2

[root@station02 ~]# rpm -ivh *.rpm
[root@station02 ~]# tar xf php-5.4.13.tar.bz2
[root@station02 ~]# cd php-5.4.13
[root@station02 php-5.4.13]# ./configure --prefix=/usr/local/php  --with-openssl  --enable-mbstring --with-freetype-dir --with-jpeg-dir --with-png-dir --with-zlib --with-libxml-dir=/usr --enable-xml  --enable-sockets  --with-mcrypt  --with-config-file-path=/etc  --with-config-file-scan-dir=/etc/php.d --with-bz2  --enable-maintainer-zts --with-mysql=mysqlnd --with-pdo-mysql=mysqlnd --with-mysqli=mysqlnd --enable-fpm
[root@station02 php-5.4.13]# make &&make install
[root@station02 php-5.4.13]# cp php.ini-production /etc/php.ini
[root@station02 php-5.4.13]# cp sapi/fpm/init.d.php-fpm /etc/init.d/php-fpm
[root@station02 php-5.4.13]# chmod +x /etc/init.d/php-fpm
[root@station02 php-5.4.13]# chkconfig --add php-fpm
[root@station02 php-5.4.13]# chkconfig php-fpm on
[root@station02 php-5.4.13]# cd /usr/local/php/
[root@station02 php]# cp etc/php-fpm.conf.default etc/php-fpm.conf
[root@station02 php]# vim etc/php-fpm.conf[/code]
配置fpm的相关选项为你所需要的值,并启用pid文件:
[code]pm.max_children = 50
pm.start_servers = 5
pm.min_spare_servers = 2
pm.max_spare_servers = 8
pid = /usr/local/php/var/run/php-fpm.pid
[root@station02 php]# service php-fpm start[/code]
检查php-fpm是否正常
[code][root@station02 php]# netstat -tunlp |grep 9000
[root@station02 php]# ps -ef |grep php-fpm

二进制配置MySQL

[root@station03 ~]# tar xf mysql-5.5.28-linux2.6-i686.tar.gz -C /usr/local/
[root@station03 ~]# cd /usr/local/
[root@station03 local]# groupadd -g 3306 mysql
[root@station03 local]# useradd -g mysql -u 3306 mysql -s /sbin/nologin -M
[root@station03 local]# ln -s mysql-5.5.28-linux2.6-i686/ mysql
[root@station03 local]# cd mysql
[root@station03 mysql]# chown -R mysql.root .
[root@station03 mysql]# chown -R mysql.mysql data/
[root@station03 mysql]# scripts/mysql_install_db --datadir=/usr/local/mysql/data/ --user=mysql
[root@station03 mysql]# cp support-files/mysql.server  /etc/init.d/mysqld
[root@station03 mysql]# chmod +x /etc/init.d/mysqld
[root@station03 mysql]# chkconfig --add mysqld
[root@station03 mysql]# chkconfig mysqld on
[root@station03 mysql]# cp support-files/my-large.cnf /etc/my.cnf
[root@station03 mysql]# vim /etc/my.cnf
#如果data目录更改,则需要在mysqld段中注明
[root@station03 mysql]# service mysqld start
[root@station03 mysql]# vim /etc/profile.d/mysqld.sh
export PATH=$PATH:/usr/local/mysql/bin
[root@station03 mysql]# . /etc/profile.d/mysqld.sh
[root@station03 ~]# mysql
mysql> update user set password=password('asdasd') where user='root';
mysql> flush privileges;

Apache与PHP整合工作

[root@station01 ~]# vim /etc/httpd/httpd.conf[/code]
[code]#DocumentRoot "/usr/local/apache/htdocs"
DirectoryIndex index.html index.php
AddType application/x-httpd-php .php
AddType application/x-httpd-php-source .phps
Include /etc/httpd/extra/httpd-vhosts.conf
LoadModule proxy_fcgi_module modules/mod_proxy_fcgi.so
LoadModule proxy_module modules/mod_proxy.so
[root@station01 ~]# vim /etc/httpd/extra/httpd-vhosts.conf
<VirtualHost *:80>
       DocumentRoot "/web/html"
       ServerName "www.neo.com"
       ErrorLog "logs/www.neo.com_error_log"
       CustomLog "logs/www.neo.com_access_log" combined
       <Directory "/web/html">
               Options None
               Require all granted
       </Directory>
       ProxyRequests Off
       ProxyPassMatch ^/(.*)\.php$ fcgi://192.168.100.12:9000/web/html/$1.php
</VirtualHost>[/code]
[code][root@station01 ~]# mkdir /web/html -p
[root@station02 ~]# mkdir /web/html -p
[root@station01 ~]# vim /web/html/index.php
<?php
phpinfo();

浏览器访问http://192.168.100.11/index.php
云厉的博客
验证PHP是否能连上MySQL

<?php
$link=mysql_connect('192.168.100.13','root','asdasd');
if(!$link)
    echo "<h1>connect failed !!!!</h1> ";
else
    echo "<h1>success ....</h1>";
mysql_close();

云厉的博客

转载自:http://junwang.blog.51cto.com/5050337/1422899

Linux查看Nginx、Apache、MySQL、PHP的编译参数

软件安装好了,想查看当初编译时的参数,怎么搞?

1、Nginx,可以通过 -V 参数查看Nginx版本及编译参数

/usr/local/nginx/sbin/nginx -V

nginx version: nginx/1.10.2
built by gcc 4.4.6 20110731 (Red Hat 4.4.6-4) (GCC)
configure arguments: --prefix=/usr/local/nginx/ --with-http_image_filter_module --with-http_gunzip_module --with-http_gzip_static_module --with-http_dav_module --with-http_auth_request_module --with-http_secure_link_module --with-http_slice_module --with-http_stub_status_module --with-stream --with-pcre=/usr/local/tools/pcre-8.38 --with-zlib=/usr/local/tools/zlib-1.2.8

2、Apache,编译参数存放在 apache 的 config.nice 文件,前提时,没有做过 make clean

locate config.nice | grep apache | xargs cat

#! /bin/sh
#
# Created by configure

"./configure" \
"--with-apr=/usr/local/apr/" \
"--with-apr-util=/usr/local/apr-util/" \
"--with-pcre=/usr/local/pcre/" \
"ap_cv_void_ptr_lt_long=no" \
"--enable-proxy" \
"--enable-proxy-connect" \
"--enable-proxy-ftp" \
"--enable-proxy-http" \
"--enable-proxy-scgi" \
"--enable-proxy-ajp" \
"--enable-proxy-balancer" \
"$@"

3、MySQL,利用 msyqlbug 工具,查看MySQL信息

VISUAL=vim; export VISUAL; mysqlbug

...
Some paths: /usr/bin/perl /usr/bin/make /usr/bin/gmake /usr/bin/gcc /usr/bin/cc
GCC: Using built-in specs.
Target: x86_64-redhat-linux
Configured with: ../configure --prefix=/usr --mandir=/usr/share/man --infodir=/usr/share/info --with-bugurl=http://bugzilla.redhat.com/bugzilla --enab
le-bootstrap --enable-shared --enable-threads=posix --enable-checking=release --with-system-zlib --enable-__cxa_atexit --disable-libunwind-exceptions
--enable-gnu-unique-object --enable-languages=c,c++,objc,obj-c++,java,fortran,ada --enable-java-awt=gtk --disable-dssi --with-java-home=/usr/lib/jvm/j
ava-1.5.0-gcj-1.5.0.0/jre --enable-libgcj-multifile --enable-java-maintainer-mode --with-ecj-jar=/usr/share/java/eclipse-ecj.jar --disable-libjava-mul
tilib --with-ppl --with-cloog --with-tune=generic --with-arch_32=i686 --build=x86_64-redhat-linux
Thread model: posix
gcc version 4.4.6 20110731 (Red Hat 4.4.6-4) (GCC)
Compilation info (call): CC='/usr/local/gcc-4.3.4/bin/gcc' CFLAGS=' -fPIC -Wall -O3 -g -static-libgcc -fno-omit-frame-pointer -fno-strict-aliasing -D
DBUG_OFF -DMY_PTHREAD_FASTMUTEX=1' CXX='/usr/local/gcc-4.3.4/bin/g++' CXXFLAGS=' -fPIC -Wall -Wno-unused-parameter -fno-implicit-templates -fno-exce
ptions -fno-rtti -O3 -g -static-libgcc -fno-omit-frame-pointer -fno-strict-aliasing -DDBUG_OFF -DMY_PTHREAD_FASTMUTEX=1' LDFLAGS='' ASFLAGS=''
Compilation info (used): CC='/usr/local/gcc-4.3.4/bin/gcc' CFLAGS=' -fPIC -Wall -O3 -g -static-libgcc -fno-omit-frame-pointer -fno-strict-aliasing -D
DBUG_OFF -DMY_PTHREAD_FASTMUTEX=1' CXX='/usr/local/gcc-4.3.4/bin/g++' CXXFLAGS=' -fPIC -Wall -Wno-unused-parameter -fno-implicit-templates -fno-exce
ptions -fno-rtti -O3 -g -static-libgcc -fno-omit-frame-pointer -fno-strict-aliasing -DDBUG_OFF -DMY_PTHREAD_FASTMUTEX=1' LDFLAGS='' ASFLAGS=''
LIBC:
...
...

4、PHP,可以通过 -i 参数可以打印PHP全局变量和安装信息

/usr/bin/php -i | grep configure

Configure Command => './configure' '--prefix=/usr/local/php/' '--enable-fpm' '--enable-opcache' '--enable-inline-optimization' '--with-libxml-dir=/usr/local/libxml2/' '--with-curl=/usr/local/curl/' '--enable-dba' '--with-gd' '--enable-gd-native-ttf' '--enable-gd-jis-conv' '--with-jpeg-dir=/usr/local/jpeg/' '--with-png-dir=/usr/local/libpng/' '--with-zlib-dir=/usr/local/zlib/' '--with-freetype-dir=/usr/local/freetype/' '--with-pcre-regex=/usr/local/pcre/' '--with-pcre-jit' '--with-pcre-dir=/usr/local/pcre/' '--enable-mbstring' '--enable-pcntl' '--enable-soap' '--enable-shmop' '--enable-sockets' '--enable-sysvsem' '--enable-zip' '--enable-mysqlnd' '--with-mysqli=mysqlnd' '--with-pdo-mysql=mysqlnd'

所有PHP脚本自动包含文件

先看三个典型的应用场景:
1、一台专用于跑定时任务服务器,可能包含了N个项目,每个项目又包含了N个定时任务,每个任务,都依赖某些数据库配置,常规做法都是在每个任务上用require或include或注册自动函数去加载这些文件
2、复杂的后台架构,都会用到中间层,中间层除了逻辑本身,还承担了接口转发的工作,如果你的项目涉及N个组件的N个REST接口,常规做法一般是写一个配置文件,配置他们的映射关系,然后由中间层去读取这个配置
3、一个研发团队,往往都有自己的公共组件、公共类库、函数库,可能是自己开发的也可能第三方的,当开发者需要用到这些公共组件或类库时,常规做法就是拷贝到自己工程目录内,

这里有个共同的问题就是需要手工去加载公共配置文件,那么有没有一个不需要手工加载,让你的每个脚本在编译的时候就自动的包含这些文件呢?

必然是有的,PHP有两个重要的配置

  • auto_prepend_file 自动的在你的PHP脚本前包含文件
  • auto_append_file 自动的在你的PHP脚本前包含文件

例如:

auto_prepend_file = "/service/auto_include.php"
auto_append_file = "/service/footer.php"

这样就相当于你所有的PHP脚本都拥有了 auto_include.php、footer.php 的代码

你可以将数据库配置信息统一定义 auto_include.php,这样你整台服务器的PHP都能用统一的数据库信息了,一单需要修改(如数据库密码、端口号等)只要改这一个文件即可;
您也可以定义好想要的各种类库,然后统一包含在 auto_include.php,这样你便可以在任何地方使用到自己的底层类库了。

用过新浪云SAE的人应该知道,在SAE环境内,你可以使用很多SAE官方提供的云服务如KVDB、Stroage、FetchURL、...)对应的类库或者接口,这些服务,并不是PHP扩展,而是SAE官方预先写好的服务,在通过auto_prepend_file加载到用户的脚本里

附:

如果使用的是Apache,还可以对单个目录进行不同配置选项的修改。这样做的前提是服务器允许重设其主配置文件。要给目录设定自动前加入和自动追加,需要在该目录中创建一个名为 .htaccess 的文件。这个文件需要包含如下两行代码:

php_value auto_prepend_file "/service/auto_include.php"
php_value auto_append_file "/service/footer.php"

注意:
其语法与配置文件php.ini中的相应选项有所不同,和行开始处的php_value一样:没有等号。
许多php.ini中的配置设定也可以按这种方法进行修改。
在 .htaccess 中设置选项,而不是php.ini中 或是在Web服务器的配置文件中进行设置,将带来极大的灵活性。
可以在一台只影响你的目录的共享机器上进行。
不需要重新启动服务器而且不需要管理员权限。
使用 .htaccess 方法的一个缺点就是目录中每个被读取和被解析的文件每次都要进行处理,而不是只在启动时处理一次,所以性能会有所降低。

实际应用

简单实用的PHPMonitor:运行错误监控

微信公众号:程序员到架构师

最新文章

Return Top