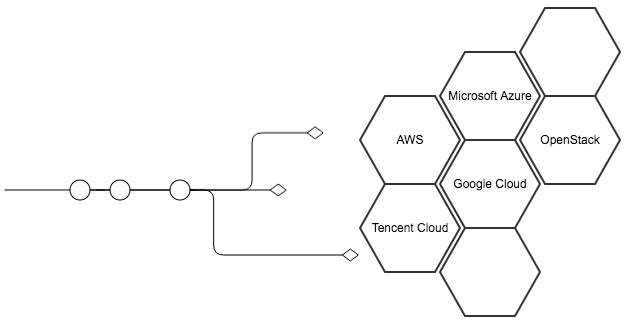
Terraform是国际著名的开源的资源编排工具,据不完全统计,全球已有超过一百家云厂商及服务提供商支持Terraform。这篇文章从Terraform-Provider系统架构开始,到Terraform核心库讲解,到实践Terraform-Provider开发,再到单元测试,比较完整的描述了支持Terraform的开发全过程
1. Terraform是什么?
Terraform是一款基于Golang的开源的资源编排工具,可以让用户管理配置任何基础架构,可以管理公有云和私有云服务的基础架构,也可以管理外部服务。
如果你不知道什么叫资源编排,那 AWS控制台 、腾讯云控制台 你一定知道,你可以在这些控制台管理你的所有云资源,Terraform和控制台作用一样,本质都是管理你的云资源,只不过,控制台是界面化的操作,而Terraform是通过配置文件来实现
当你的基础架构很复杂时,当你在某云厂商采买了规模较大的云资源或云服务时,当你的基础架构是基于混合云时,...,控制台的界面化操作,也许并不是最佳的管理工具,这时候,Terraform可能就是上古神器了
2. 怎么使用Terraform管理基础架构?
在开始开发之前,我们先了解下用户是怎么玩的,这尤其重要,这有助于更好的理解我们后续的开发流程和开发思路
简单来说,用户就是维护一些类似 json 格式的 .tf 配置文件,通过对配置的增删改查,实现对基础架构资源的增删改查。
我在文章《巧用Terraform完成腾讯云上自动运维》是完全站在用户角度,讲述如何利用Terraform管理基础架构的,这里不再重复用户层的内容
3. 配置开发环境
Terraform支持插件模型,并且所有 provider 实际就是插件,插件以Go二进制文件的形式分发。虽然技术上可以用另一种语言编写插件,但几乎所有的Terraform插件都是用Golang编写的。
本文是在下列版本开发和测试的
- Terraform 0.11.x
- Go 1.9 (to build the provider plugin)
为了不使本文篇幅太长,环境相关请直接参考我们 Github 上的 README.md,这里就不重复写了,假设你已经准备好了开发环境
4. Provider架构
按照Go的开发习惯和Github路径,我把开发目录放在了
cd $GOPATH/src/github.com/tencentyun/terraform-provider-tencentcloud
接下来,我们了解下 tencentcloud 的插件目录,以此了解 Provider 架构
├─terraform-provider-tencentcloud                    根目录
│  ├─main.go                                         程序入口文件
│  ├─AUTHORS                                         作者信息
│  ├─CHANGELOG.md                                    变更日志
│  ├─LICENSE                                         授权信息
│  ├─debug.tf.example                                调试配置文件示例
│  ├─examples                                        示例配置文件目录
│  │  ├─tencentcloud-eip                             EIP示例tf文件
│  │  ├─tencentcloud-instance                        CVM示例tf文件
│  │  ├─tencentcloud-nat                             NAT网关示例tf文件
│  │  ├─tencentcloud-vpc                             VPC示例tf文件
│  │  └─ ...                                         更多examples目录
│  ├─tencentcloud                                    Provider核心目录
│  │  ├─basic_test.go                                基础单元测试
│  │  ├─config.go                                    公共配置文件
│  │  ├─data_source_tc_availability_zones.go         可用区查询
│  │  ├─data_source_tc_availability_zones_test.go
│  │  ├─data_source_tc_nats.go                       NAT网关列表查询
│  │  ├─data_source_tc_nats_test.go
│  │  ├─data_source_tc_vpc.go                        VPC查询
│  │  ├─data_source_tc_vpc_test.go
│  │  ├─...                                          更多Data Source
│  │  ├─helper.go                                    一些公共函数
│  │  ├─provider.go                                  Provider核心文件
│  │  ├─provider_test.go
│  │  ├─resource_tc_eip.go                           EIP资源管理程序
│  │  ├─resource_tc_eip_test.go
│  │  ├─resource_tc_instance.go                      CVM实例资源管理程序
│  │  ├─resource_tc_instance_test.go
│  │  ├─resource_tc_nat_gateway.go                   NAT网关资源管理程序
│  │  ├─resource_tc_nat_gateway_test.go
│  │  ├─resource_tc_vpc.go                           VPC网关资源管理程序
│  │  ├─resource_tc_vpc_test.go
│  │  ├─...                                          更多资源管理程序
│  │  ├─service_eip.go                               封装的EIP相关Service
│  │  ├─service_instance.go                          封装的CVM实例相关Service
│  │  ├─service_vpc.go                               封装的VPC相关Service
│  │  ├─...
│  │  ├─validators.go                                公共的参数校验函数
│  ├─vendor                                          依赖的第三方库
│  ├─website                                         Web相关文件
│  │  ├─tencentcloud.erb                             文档左侧菜单栏
│  │  ├─docs                                         文档markdown源文件目录
│  │  │  ├─d                                         data相关文档(data_source_*)
│  │  │  │  ├─availability_zones.html.md
│  │  │  │  ├─nats.html.markdown
│  │  │  │  ├─vpc.html.markdown
│  │  │  │  ├─...
│  │  │  ├─index.html.markdown
│  │  │  ├─r                                         resource相关文档(resource_*)
│  │  │  │  ├─instance.html.markdown
│  │  │  │  ├─nat_gateway.html.markdown
│  │  │  │  ├─vpc.html.markdown
│  │  │  │  └─...
结构主要分五部分
main.go,插件入口- examples,示例目录,因为你的插件最终是给用户用的,一个比较理想的示例,是用户拉到代码后,可以直接跑起来
- tencentcloud,最重要的目录,也就是我们的插件目录,里面都是Go文件,其中
provider.go 这是插件的根源,用于描述插件的属性,如:配置的秘钥,支持的资源列表,回调配置等data_source_*.go 定义的一些用于读调用的资源,主要是查询接口resource_*.go 定义的一些写调用的资源,包含资源增删改查接口service_*.go 按资源大类划分的一些公共方法
- vendor,依赖的第三方库
- website,文档,重要性同examples
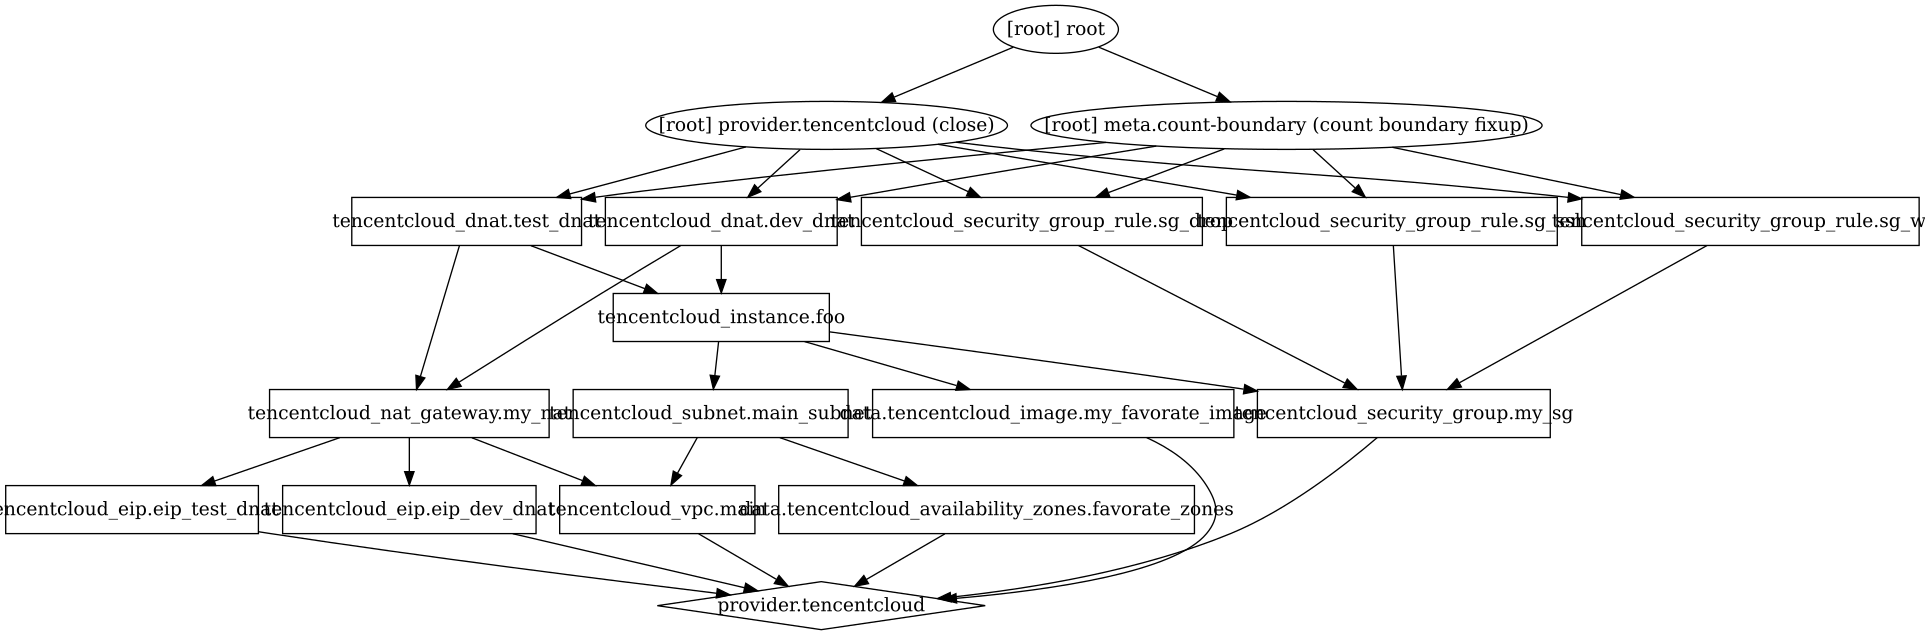
5. 生命周期
下图是Terraform的整个执行过程:
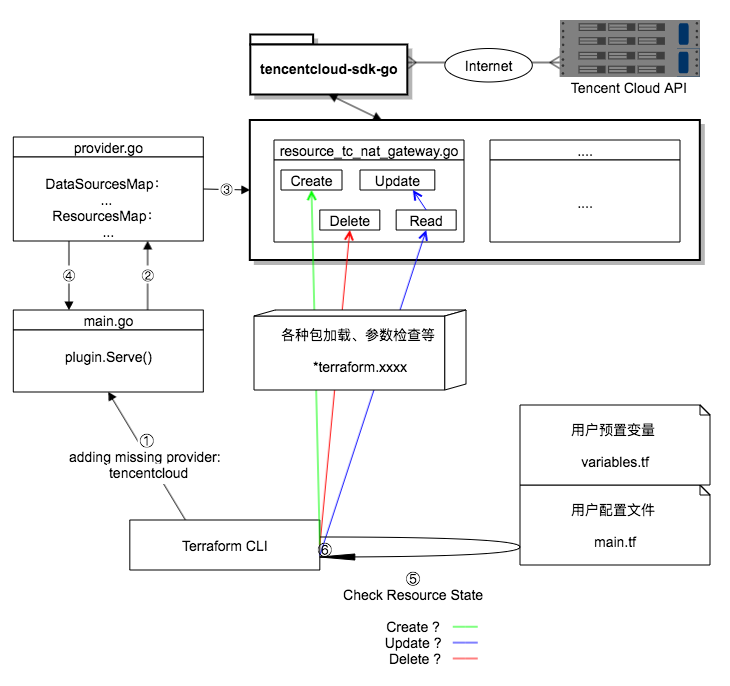
- ① ~ ④ 是在寻找
Provider,tencentcloud 插件就是这时候加载的
- ⑤ 是读取用户的配置文件,通过配置文件,可以获得分别属于哪种资源,以及每个资源的状态
- ⑥ 根据资源的状态,调用不同的函数,
Create Update Delete 都属于写操作,而 Read 操作,只在 Update 的时候,作为前置操作
何谓 Create ?
当在 .tf 文件增加一个新的资源配置时,这时候 Terraform 认为是 Create
何谓 Update ?
当在 .tf 文件针对已经创建好的资源,修改其中一个或多个参数时,这时候 Terraform 认为是 Update
何谓 Delete ?
当把 .tf 文件中已经创建好的资源配置删掉后,或执行 terraform destroy 命令时,这时候 Terraform 认为是 Delete
何谓 Read ?
顾名思义,这是一个查询资源的操作,如前述 Read 只在 Update 的时候,作为前置操作,实际作用就是检查资源是否存在,以及更新资源属性到本地
细心的你一定注意到了 tencentcloud-sdk-go 这个 package,tencentcloud-sdk-go 是我们封装的一个独立于 Terraform 之外的基于 Tencent Cloud API 的Go版SDK
其作用就是负责调用 Tencent Cloud API
当然,你也可以不用它,直接在你的 terraform-provider 里组装参数、发送请求,但我们不建议这么做,使用SDK方式,可以让你的代码更加优雅,可以实现对出入参、HTTP请求的集中管理,可以让你的常用接口更好的复用,减少代码冗余
6. 定义资源
Terraform官网有个从 main.go 入口开始编写自定义Provider的指引 Writing Custom Providers,建议先浏览一遍。
成为Terraform提供商(开发Terraform插件),实际是对上游 API 的抽象,而所谓的资源就是我们的服务,比如云主机、私有网络、NAT网关。按惯例,我们要把每个资源放在自己的插件目录下,并以资源命名,前缀为 resource_ 或 data_source_,比如
tencentcloud/resource_tc_nat_gateway.go
package tencentcloud

import (
    "github.com/hashicorp/terraform/helper/schema"
)

func resourceTencentCloudNatGateway() *schema.Resource {
    return &schema.Resource{
        Create: resourceTencentCloudNatGatewayCreate,
        Read:   resourceTencentCloudNatGatewayRead,
        Update: resourceTencentCloudNatGatewayUpdate,
        Delete: resourceTencentCloudNatGatewayDelete,

        Schema: map[string]*schema.Schema{
            "vpc_id": &schema.Schema{
                Type:     schema.TypeString,
                Required: true,
                ForceNew: true,
            },
            "name": &schema.Schema{
                Type:         schema.TypeString,
                Required:     true,
                ValidateFunc: validateStringLengthInRange(1, 60),
            },
            "max_concurrent": &schema.Schema{
                Type:     schema.TypeInt,
                Required: true,
            },
            "bandwidth": &schema.Schema{
                Type:     schema.TypeInt,
                Required: true,
            },
            "assigned_eip_set": &schema.Schema{
                Type:     schema.TypeSet,
                Required: true,
                Elem: &schema.Schema{
                    Type: schema.TypeString,
                },
                MinItems: 1,
                MaxItems: 10,
            },
        },
    }
}

func resourceTencentCloudNatGatewayCreate(d *schema.ResourceData, meta interface{}) error {
    return nil
}

func resourceTencentCloudNatGatewayRead(d *schema.ResourceData, meta interface{}) error {
    return nil
}

func resourceTencentCloudNatGatewayUpdate(d *schema.ResourceData, meta interface{}) error {
    return nil
}

func resourceTencentCloudNatGatewayDelete(d *schema.ResourceData, meta interface{}) error {
    return nil
}
这里实际就是返回了一个 schema.Resource 类型的结构体,结构体中我们定义了资源参数和CRUD操作
- Create
- Read
- Update
- Delete
- Schema
其中 Schema 就是定义的资源参数,是 map[string]*schema.Schema 类型的嵌套数组,这是一个非常重要的数组,在Terraform里,你也理解为这些就是一个资源的属性
在我们本次的示例中,就是一个NAT网关的所有属性(这些属性,我们可以在NAT网关的云API中看到)
每个属性,它的值都是一个结构体,包含了若干属性,这些属性,都是围绕资源属性值的,下面逐一介绍
Type schema.ValueType
定义这个属性的值的数据类型,可选值及对应的数据类型
- TypeBool - bool
- TypeInt - int
- TypeFloat - float64
- TypeString - string
- TypeList - []interface{}
- TypeMap - map[string]interface{}
- TypeSet - *schema.Set
Required bool
也就我们经常在 API 里说的 参数是否必填,默认 false,当设置为 true 后,用户对资源增删改操作时,都需要配置该参数
Optional bool
是否可选的,和 Required 互斥的,不能同时配置 Required 和 Optional,即一个属性(参数)要么必填,要么可选
ForceNew bool
如果设置为 true,当资源属性值发生变化时,不会触发修改动作,而是删除该资源,再创建新的资源,即:
修改 = 删除 + 创建
这是一个非常有用的属性,我们很多云资源的很多属性都不支持修改,比如
- 一个CVM实例创建时指定的子网,创建后,是不支持修改的
- 一个NAT网关创建时指定的VPC,创建后,是无法修改的
在控制台可以通过前端技术实现这样的限制,Terraform 同样可以做到这样的限制,但 ForceNew 实现了更高级的用法,给用户提供了更多选择,
一个有趣的事情,如果某种云资源的所有属性,都是Required,并且属性联合起来,具有唯一性,比如路由表的路由策略、DNAT规则、KeyPair、...,都是这类特性,这时候你修改一个属性,实际就等价于删除旧资源,创建新资源
这时候,你就可以把所有属性的ForceNew 设为 true,然后不用实现 Update 函数了,因为无论用户修改哪个属性,都是走 Delete - Create 的流程,根本不会走到 Update 的流程里,但实现的效果,都是一样的,用户是无感知的
ValidateFunc SchemaValidateFunc
属性值的扩展验证函数,验证IP合法性示例:
func validateIp(v interface{}, k string) (ws []string, errors []error) {
    value := v.(string)
    ip := net.ParseIP(value)
    if ip == nil {
        errors = append(errors, fmt.Errorf("%q must contain a valid IP", k))
    }
    return
}
MinItems、MaxItems int
当 Type 为 TypeSet 或 TypeList 类型时,可以给 MinItems 和 MaxItems 赋值,限定属性值元素的最小个数和最大个数,上述代码中,我们限定了NAT网关的关联EIP个数范围是1~10个
CRUD操作
这4个操作 Create Read Update Delete,指向的是4个函数,也是我们重点要实现的。
在"生命周期"一节中,我们知道了Terraform是根据资源的模式和状态,来决定是否需要创建新资源,更新现有资源或销毁资源的,而最终就是调用这4个函数来实现的
7. CRUD实现
了解了用户行为、Terraform执行流程、资源管理逻辑,现在就是实现这些功能的时候了
因为这块内容较多,这里继续用NAT网关作为示例,详述一个资源CURD的实现
开始之前,我们需要引入更多的包,都是我们后面要用到的
import (
    "encoding/json"
    "errors"
    "fmt"
    "log"

    "github.com/hashicorp/terraform/helper/schema"
    "github.com/zqfan/tencentcloud-sdk-go/common"
    vpc "github.com/zqfan/tencentcloud-sdk-go/services/vpc/unversioned"
)

//...

func resourceTencentCloudNatGatewayCreate(d *schema.ResourceData, meta interface{}) error {
    return nil
}

func resourceTencentCloudNatGatewayRead(d *schema.ResourceData, meta interface{}) error {
    return nil
}

func resourceTencentCloudNatGatewayUpdate(d *schema.ResourceData, meta interface{}) error {
    return nil
}

func resourceTencentCloudNatGatewayDelete(d *schema.ResourceData, meta interface{}) error {
    return nil
}
上述代码中,我们看到,我们要实现的资源管理函数,出参都是 error 类型,说明Terraform都是根据 error 来判断成功与否的,返回 nil 时表示操作成功,否则就报错
入参都是 *schema.ResourceData 类型的参数 d,和 interface{} 类型的参数 meta,具体这两个参数有什么用呢?
这是我们这节的关键!
参数 d 是我们开发过程中用的最多的参数,它的数据类型是个对象,包含了非常的方法,下面我们介绍几个常用的方法
func (*ResourceData) Get
func (d *ResourceData) Get(key string) interface{}
用来获取给定 Key 的数据,如果给定的 Key 不存在,会返回 nil
通过 Set 方法设置的数据,以及用户配置的参数,都可以通过这个方法获得
一般,我们在 Create 资源的时候,用的比较多
func (*ResourceData) GetOk
func (d *ResourceData) GetOk(key string) (interface{}, bool)
检查给定的 Key 是否设置为一个非0的值,一般我们在获取 Optional 类型的属性值的时候,会用到
func (*ResourceData) SetId
func (d *ResourceData) SetId(v string)
Terraform对资源的管理都是围绕ID实现的,每个资源都有一个唯一ID,一个ID代表一个资源,因此,当创建资源后,需要调用这个方法写入资源ID,一般服务端都会返回资源唯一ID,比如我们的示例中,这个ID就是NAT网关的ID.
eg: nat-79r5e43i
这时候,你是不是有一个疑惑?我们的资源没有唯一 ID 怎么办?
对于没有唯一ID的资源,比如路由策略、安全组规则的增删改查,我们就需要自己构造ID了。
可以用某个参数作为ID;也可以多个参数联合起来;也可以自己实现一个算法生成ID。
前提条件就是一定要唯一 ,然后我们在用到ID的时候,再反解出来,这就间接实现了我们所需要的唯一 ID
func (*ResourceData) Id
func (d *ResourceData) Id() string
获取当前的资源ID,也就是 SetId 方法写入的值,比如我们在 Read Update Delete 的时候,都需要用到ID,映射到对应的资源,从而完成对某个资源的读取,修改,删除
func (*ResourceData) Set
func (d *ResourceData) Set(key string, value interface{}) error
给某个 Key 设置值,设置后,可以用 Get 方法获取,一般用于 Read 操作,从服务端 Read 完数据后,会将资源的属性 Set 到本地,用于后续的其他资源管理操作
func (*ResourceData) HasChange
func (d *ResourceData) HasChange(key string) bool
想象一下,当用户修改了他的配置文件(也就是修改资源的属性),我们的程序是怎么知道的?
这时候,就需要用到 HasChange 了,检查给定的 Key 是否发生变化,一个非常有用而且经常会用到的方法,一般在 Update 操作的时候,我们需要监控用户的配置文件,发生变化时,我们就触发变更操作
func (*ResourceData) GetChange
func (d *ResourceData) GetChange(key string) (interface{}, interface{})
这个方法就是当我们在使用 HasChange 方法知道数据发生变化时,用这个方法可以获取到变化前后的数据,即旧数据和新数据
比如用户修改了NAT网关的关联弹性IP,这时候,我们就需要将对比新旧数据,将用户删减的弹性IP,从服务端解绑,用户增加的弹性IP,绑定到NAT网关
func (*ResourceData) Partial
func (d *ResourceData) Partial(on bool)
一般我们的资源属性,有非常多属性是支持修改的,比如我们这次示例中NAT网关,其中NAT网关的名称 name、最大并发连接数 max_concurrent、带宽上限 bandwidth、关联弹性IP assigned_eip_set 都是支持修改的。
对用户来说,这些都是NAT网关的属性值而已,但对我们开发人员来说,涉及到的后端接口却是不一样的,这时候,如果用户修改了多个属性值,按照文档流的执行方式,如果前面执行的修改成功了,后面执行的失败了,这时候如果退出程序,给用户报错,就不合理了,因为实际我们的后端,已经修改了其中部分属性值。
这时候,服务端的数据和用户本地的数据,也不一致了,后续的其他操作,也会出现比较严重的问题
所以,我们应该不难理解这个方法的用途,就是用来设置是否 允许修改部分属性 的方法,默认false,当开启 允许修改部分属性 后,使用了 SetPartial 方法设置的属性,即便 Update 出现错误,已经修改成功的属性,也会将状态同步到本地,程序下次执行时,就不会认为是要更新的了
总结三个字就是 “非事务”
func (*ResourceData) SetPartial
func (d *ResourceData) SetPartial(k string)
这个方法就是配合 Partial 方法使用的,经过这个方法设置的属性,允许修改部分属性 的逻辑才有效
7.1 创建资源
这里就是创建NAT网关
func resourceTencentCloudNatGatewayCreate(d *schema.ResourceData, meta interface{}) error {

    // 创建请求对象
    args := vpc.NewCreateNatGatewayRequest()

    // 给对象属性赋值,这里要注意,因为
    args.VpcId = common.StringPtr(d.Get("vpc_id").(string))
    args.NatName = common.StringPtr(d.Get("name").(string))

    // 因为 max_concurrent 和 bandwidth 是可选值,所以我们用 GetOk 判断用户是否配置
    if v, ok := d.GetOk("max_concurrent"); ok {
        args.MaxConcurrent = common.IntPtr(v.(int))
    }
    if v, ok := d.GetOk("bandwidth"); ok {
        args.Bandwidth = common.IntPtr(v.(int))
    }

    // assigned_eip_set 是个数组,取值方法和整型、字符串有点不一样,需要用 List 方法
    eips := d.Get("assigned_eip_set").(*schema.Set).List()
    args.AssignedEipSet = common.StringPtrs(expandStringList(eips))

    // 这里就是发送请求了
    client := meta.(*TencentCloudClient)
    conn := client.vpcConn
    response, err := conn.CreateNatGateway(args)
    b, _ := json.Marshal(response)
    log.Printf("[DEBUG] conn.CreateNatGateway response: %s", b)
    if _, ok := err.(*common.APIError); ok {
        return fmt.Errorf("conn.CreateNatGateway error: %v", err)
    }

    // 因为NAT网关的创建是异步的,到这里,我们只拿到了一个BillId,所以需要用到轮询逻辑了
    if _, err := client.PollingVpcBillResult(response.BillId); err != nil {
        return err
    }

    // 为了方便调试,我们把NAT网关ID记录到日志
    log.Printf("[DEBUG] conn.CreateNatGateway NatGatewayId: %s", *response.NatGatewayId)

    // 调用 SetId 写入资源ID(这里就是NAT网关ID),关于 SetId 方法的作用,参考前面说的
    d.SetId(*response.NatGatewayId)
    return nil
}
上述代码中 PollingVpcBillResult,我们说到了轮询,其实在Terraform开发中,轮询这个操作,是用的很频繁的,主要适用于异步的服务端接口,比如当前示例的NAT网关创建,还有后面会讲到的修改带宽,又如一些资源删除也都是异步的。
服务端只返回一个任务ID,这时候需要我们在客户端轮询任务,直到结果返回,我们才能直到这个资源的真正的状态!
这个方法位于 service_vpc.go,并且是作为 *TencentCloudClient 对象的一个方法,核心是用到了Terraform官方的 resource 库,直接来看下这个方法吧,
func (client *TencentCloudClient) PollingVpcBillResult(billId *string) (status bool, err error) {
    queryReq := vpc.NewQueryNatGatewayProductionStatusRequest()
    queryReq.BillId = billId
    status = false
    // 设置超时时间为3分钟
    err = resource.Retry(3*time.Minute, func() *resource.RetryError {
        queryResp, err := client.vpcConn.QueryNatGatewayProductionStatus(queryReq)
        b, _ := json.Marshal(queryResp)
        log.Printf("[DEBUG] client.vpcConn.QueryNatGatewayProductionStatus response: %s", b)
        if _, ok := err.(*common.APIError); ok {
            // 返回 NonRetryableError 错误,resource 会退出重试,并返回错误信息
            return resource.NonRetryableError(fmt.Errorf("client.vpcConn.QueryNatGatewayProductionStatus error: %v", err))
        }
        // 返回 nil 之后,表示操作成功,resource 就会退出重试
        if *queryResp.Data.Status == vpc.BillStatusSuccess {
            return nil
        }
        // 返回一个 RetryableError 错误,resource 将持续重试
        return resource.RetryableError(fmt.Errorf("billId %v, not ready, status: %v", billId, *queryResp.Data.Status))
    })
    return
}
7.2 读取资源
在 Create 的代码末尾,我们看到了 SetId,而 Read 操作,我们就是要根据资源ID,查询资源,然后调用 Set 方法回写本地
func resourceTencentCloudNatGatewayRead(d *schema.ResourceData, meta interface{}) error {

    conn := meta.(*TencentCloudClient).vpcConn

    descReq := vpc.NewDescribeNatGatewayRequest()
    descReq.NatId = common.StringPtr(d.Id())

    descResp, err := conn.DescribeNatGateway(descReq)
    b, _ := json.Marshal(descResp)
    log.Printf("[DEBUG] conn.DescribeNatGateway response: %s", b)
    if _, ok := err.(*common.APIError); ok {
        return fmt.Errorf("conn.DescribeNatGateway error: %v", err)
    }

    // 未找到资源时,为什么不报错?SetId("") 又是什么意思?
    if *descResp.TotalCount == 0 || len(descResp.Data) == 0 {
        d.SetId("")
        return nil
    } else if err != nil {
        return err
    }

    nat := descResp.Data[0]

    d.Set("name", *nat.NatName)
    d.Set("max_concurrent", *nat.MaxConcurrent)
    d.Set("bandwidth", *nat.Bandwidth)
    d.Set("assigned_eip_set", nat.EipSet)
    return nil
}
我们在代码15行,留了个疑问,这也是很多开发,初次开发Terraform时,不太理解的地方!
当从服务端查询没有数据时,我们并不直接报错,而是把ID置空,并且返回 nil,这样做的目的是因为我们的云资源管理行为,不只在Terraform,还有控制台,也可能基于云API的其他工具,倘若不是因为你的代码Bug导致查询失败而未找到数据,那就是在其他工具删除了该资源导致资源为找到,这时候
- 返回
nil,是为了不让程序退出,让程序不认为这是错误
- 把ID置空,是为了改变资源状态,前面我们提到Terraform,对于资源的管理,是完全基于ID的,当我们把ID置空,Terraform未找到资源ID,就会认为这是一个新资源,这也是我们所预期的
7.3 修改资源
我们在生命周期那一节,讲到了 Update 操作前,Terraform实际会先调用 Read,为什么呢?
因为Terraform判断一个资源状态,是依据本地的 terraform.tfstate 文件,这里记录所有配置(即资源)的状态,但是状态并非实时的,所以 Terraform 在做 Update 操作之前,会先从服务器 Read 数据,用最新的数据和本地做对比,获取最新的资源状态
func resourceTencentCloudNatGatewayUpdate(d *schema.ResourceData, meta interface{}) error {

    client := meta.(*TencentCloudClient)
    conn := client.vpcConn

    // 开启 允许部分属性修改 功能
    d.Partial(true)

    // 标识是否有修改
    attributeUpdate := false

    updateReq := vpc.NewModifyNatGatewayRequest()
    updateReq.VpcId = common.StringPtr(d.Get("vpc_id").(string))
    updateReq.NatId = common.StringPtr(d.Id())

    // 修改NAT网关名称
    if d.HasChange("name") {
        d.SetPartial("name")
        var name string
        if v, ok := d.GetOk("name"); ok {
            name = v.(string)
        } else {
            return fmt.Errorf("cann't change name to empty string")
        }
        updateReq.NatName = common.StringPtr(name)

        attributeUpdate = true
    }

    // 修改带宽上限
    if d.HasChange("bandwidth") {
        d.SetPartial("bandwidth")
        var bandwidth int
        if v, ok := d.GetOk("bandwidth"); ok {
            bandwidth = v.(int)
        } else {
            return fmt.Errorf("cann't change bandwidth to empty string")
        }
        updateReq.Bandwidth = common.IntPtr(bandwidth)

        attributeUpdate = true
    }

    // 修改名称和带宽上限,用的同一个接口,如果有修改,就提交
    if attributeUpdate {
        updateResp, err := conn.ModifyNatGateway(updateReq)
        b, _ := json.Marshal(updateResp)
        log.Printf("[DEBUG] conn.ModifyNatGateway response: %s", b)
        if _, ok := err.(*common.APIError); ok {
            return fmt.Errorf("conn.ModifyNatGateway error: %v", err)
        }
    }

    // 修改并发连接数上限,这里用到了 GetChange,对比新旧数据
    // 因为我们的NAT网关的并发连接数上限,只能升不能降
    if d.HasChange("max_concurrent") {
        d.SetPartial("max_concurrent")
        old_mc, new_mc := d.GetChange("max_concurrent")
        old_max_concurrent := old_mc.(int)
        new_max_concurrent := new_mc.(int)
        if new_max_concurrent <= old_max_concurrent {
            return fmt.Errorf("max_concurrent only supports upgrade")
        }
        upgradeReq := vpc.NewUpgradeNatGatewayRequest()
        upgradeReq.VpcId = updateReq.VpcId
        upgradeReq.NatId = updateReq.NatId
        upgradeReq.MaxConcurrent = common.IntPtr(new_max_concurrent)

        upgradeResp, err := conn.UpgradeNatGateway(upgradeReq)
        b, _ := json.Marshal(upgradeResp)
        log.Printf("[DEBUG] conn.UpgradeNatGateway response: %s", b)
        if _, ok := err.(*common.APIError); ok {
            return fmt.Errorf("conn.UpgradeNatGateway error: %v", err)
        }

        if _, err := client.PollingVpcBillResult(upgradeResp.BillId); err != nil {
            return err
        }
    }

    // 修改关联弹性EIP,这块逻辑稍微复杂点,因为 `assigned_eip_set` 是个数组
    // 我们需要对比新旧数据,拿到用户删除的数组元素和增加的数组元素
    // 然后调用解绑接口,解绑用户删除的数组元素;再调用绑定接口,绑定用户增加的数组元素
    if d.HasChange("assigned_eip_set") {
        o, n := d.GetChange("assigned_eip_set")
        os := o.(*schema.Set)
        ns := n.(*schema.Set)

        old_eip_set := os.List()
        new_eip_set := ns.List()

        if len(old_eip_set) > 0 && len(new_eip_set) > 0 {

            // Unassign old EIP
            unassignIps := os.Difference(ns)
            if unassignIps.Len() != 0 {
                unbindReq := vpc.NewEipUnBindNatGatewayRequest()
                unbindReq.VpcId = updateReq.VpcId
                unbindReq.NatId = updateReq.NatId
                unbindReq.AssignedEipSet = common.StringPtrs(expandStringList(unassignIps.List()))
                unbindResp, err := conn.EipUnBindNatGateway(unbindReq)
                b, _ := json.Marshal(unbindResp)
                log.Printf("[DEBUG] conn.EipUnBindNatGateway response: %s", b)
                if _, ok := err.(*common.APIError); ok {
                    return fmt.Errorf("conn.EipUnBindNatGateway error: %v", err)
                }

                if _, err := client.PollingVpcTaskResult(unbindResp.TaskId); err != nil {
                    return err
                }
            }

            // Assign new EIP
            assignIps := ns.Difference(os)
            if assignIps.Len() != 0 {
                bindReq := vpc.NewEipBindNatGatewayRequest()
                bindReq.VpcId = updateReq.VpcId
                bindReq.NatId = updateReq.NatId
                bindReq.AssignedEipSet = common.StringPtrs(expandStringList(assignIps.List()))
                bindResp, err := conn.EipBindNatGateway(bindReq)
                b, _ := json.Marshal(bindResp)
                log.Printf("[DEBUG] conn.EipBindNatGateway response: %s", b)
                if _, ok := err.(*common.APIError); ok {
                    return fmt.Errorf("conn.EipBindNatGateway error: %v", err)
                }

                if _, err := client.PollingVpcTaskResult(bindResp.TaskId); err != nil {
                    return err
                }
            }

        } else {
            return errEipUnassigned
        }

        d.SetPartial("assigned_eip_set")
    }

    // 关闭 允许部分属性修改 功能
    d.Partial(false)

    return nil
}
主要思路,概括下就是:
1. 调用 Partial 方法开启 允许部分属性修改 功能
2. 调用 HasChange 方法检查是否变化,
3. 调用 SetPartial 方法把该属性加入到部分属性修改的集合里
4. 调用 GetChange 方法获取新旧数据(也可以直接 Get 最新数据)
5. 提交修改
6. 调用 Partial 方法关闭 允许部分属性修改 功能
7.4 删除资源
删除资源就是根据资源ID,从服务端将对应的资源删除
func resourceTencentCloudNatGatewayDelete(d *schema.ResourceData, meta interface{}) error {

    client := meta.(*TencentCloudClient)

    deleteReq := vpc.NewDeleteNatGatewayRequest()
    deleteReq.VpcId = common.StringPtr(d.Get("vpc_id").(string))
    deleteReq.NatId = common.StringPtr(d.Id())

    deleteResp, err := client.vpcConn.DeleteNatGateway(deleteReq)
    b, _ := json.Marshal(deleteResp)
    log.Printf("[DEBUG] client.vpcConn.DeleteNatGateway response: %s", b)
    if _, ok := err.(*common.APIError); ok {
        return fmt.Errorf("[ERROR] client.vpcConn.DeleteNatGateway error: %v", err)
    }

    _, err = client.PollingVpcTaskResult(deleteResp.TaskId)
    return err
}
示例是一个最简单的删除操作,在实际应用中,如果你的资源删除是异步的,或者删除操作,还依赖其他资源删除,比如当删除一个私有网络资源时,如果网络内还有其他资源,比如子网、VPN等,调用删除接口时,会报错,导致删除失败!
遇到这些场景,我们还需要用到前面提到的重试操作,
就是当删除失败,特定原因下(一般就是有依赖关系)我们要执行重试,因为Terraform在删除资源时,是有次序的,直接删除有可能删不掉,而重试,当依赖关系都删完后,就能删除最顶层的被依赖的资源了
至此,一个基本的资源管理程序就算写完了!最后你还需要将资源管理函数配置到 provider.go 的 ResourcesMap 映射关系列表中,才能真正被使用
8. 编写单元测试用例
到了测试环节,你可以自己编写 tf 文件,编译插件
go build -o terraform-provider-tencentcloud
然后测试你的程序
terrform plan
terrform apply
但我们非常不鼓励你这么做,我们强烈建议你自己编写单元测试用例,测试你的程序,在前面的 Provider架构 章节中,你可以看到许多的 *_test.go 这就是我们的单元测试用例
如果要成为Terraform官方认证的provider,单元测试用例,也是必不可少的
我们先来看下Terraform的单元测试系统流程图
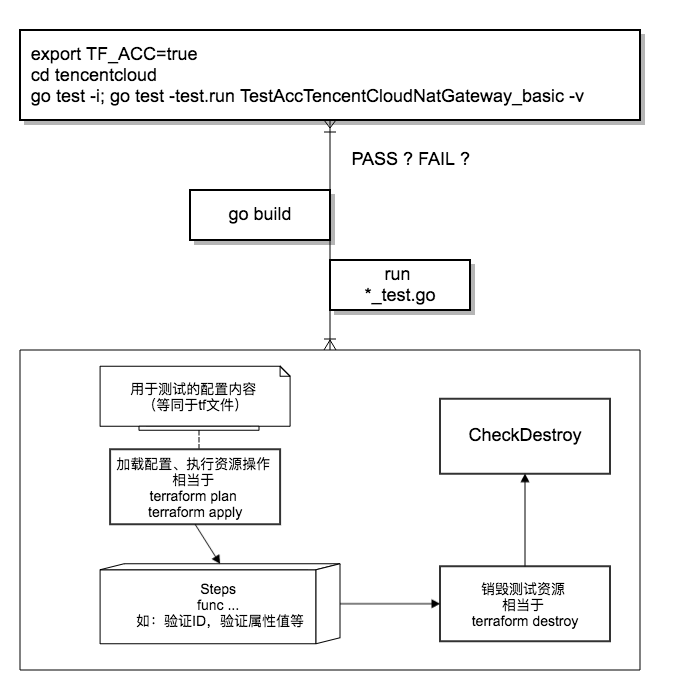
下面是NAT网关资源管理程序的单元测试用例:
package tencentcloud

import (
    "encoding/json"
    "fmt"
    "log"
    "testing"

    "github.com/hashicorp/terraform/helper/resource"
    "github.com/hashicorp/terraform/terraform"
    "github.com/zqfan/tencentcloud-sdk-go/common"
    vpc "github.com/zqfan/tencentcloud-sdk-go/services/vpc/unversioned"
)

func TestAccTencentCloudNatGateway_basic(t *testing.T) {
    resource.Test(t, resource.TestCase{
        PreCheck:     func() { testAccPreCheck(t) },
        Providers:    testAccProviders,
        // 配置 资源销毁结果检查函数
        CheckDestroy: testAccCheckNatGatewayDestroy,
        // 配置 测试步骤
        Steps: []resource.TestStep{
            {
                // 配置 配置内容
                Config: testAccNatGatewayConfig,
                // 配置 验证函数
                Check: resource.ComposeTestCheckFunc(
                    // 验证资源ID
                    testAccCheckTencentCloudDataSourceID("tencentcloud_nat_gateway.my_nat"),
                    // 验证资源属性,能匹配到,肯定就是创建成功了
                    resource.TestCheckResourceAttr("tencentcloud_nat_gateway.my_nat", "name", "terraform_test"),
                    resource.TestCheckResourceAttr("tencentcloud_nat_gateway.my_nat", "max_concurrent", "3000000"),
                    resource.TestCheckResourceAttr("tencentcloud_nat_gateway.my_nat", "bandwidth", "500"),
                    resource.TestCheckResourceAttr("tencentcloud_nat_gateway.my_nat", "assigned_eip_set.#", "2"),
                ),
            },
            {
                // 配置 配置内容
                Config: testAccNatGatewayConfigUpdate,
                Check: resource.ComposeTestCheckFunc(
                    testAccCheckTencentCloudDataSourceID("tencentcloud_nat_gateway.my_nat"),
                    // 验证修改后的属性值,如果能匹配到,肯定就是修改成功了
                    resource.TestCheckResourceAttr("tencentcloud_nat_gateway.my_nat", "name", "new_name"),
                    resource.TestCheckResourceAttr("tencentcloud_nat_gateway.my_nat", "max_concurrent", "10000000"),
                    resource.TestCheckResourceAttr("tencentcloud_nat_gateway.my_nat", "bandwidth", "1000"),
                    resource.TestCheckResourceAttr("tencentcloud_nat_gateway.my_nat", "assigned_eip_set.#", "2"),
                ),
            },
        },
    })
}

// testAccProviders 在测试前会根据 Config 建立测试资源,测试结束后又会全部销毁
// 这个函数就是检查资源是否销毁用的,代码逻辑比较好理解,就是根据ID查询资源是否存在
func testAccCheckNatGatewayDestroy(s *terraform.State) error {

    conn := testAccProvider.Meta().(*TencentCloudClient).vpcConn

    // 这用到了 s.RootModule().Resources 数组
    // 这个数组的属性反应的就是资源状态文件 terraform.tfstate
    for _, rs := range s.RootModule().Resources {
        if rs.Type != "tencentcloud_nat_gateway" {
            continue
        }

        descReq := vpc.NewDescribeNatGatewayRequest()
        descReq.NatId = common.StringPtr(rs.Primary.ID)
        descResp, err := conn.DescribeNatGateway(descReq)

        b, _ := json.Marshal(descResp)

        log.Printf("[DEBUG] conn.DescribeNatGateway response: %s", b)

        if _, ok := err.(*common.APIError); ok {
            return fmt.Errorf("conn.DescribeNatGateway error: %v", err)
        } else if *descResp.TotalCount != 0 {
            return fmt.Errorf("NAT Gateway still exists.")
        }
    }
    return nil
}

// 基本用法配置文件,机智的你,一定发现了,这不是和debug用的tf文件一样一样的么
const testAccNatGatewayConfig = `
resource "tencentcloud_vpc" "main" {
  name       = "terraform test"
  cidr_block = "10.6.0.0/16"
}
resource "tencentcloud_eip" "eip_dev_dnat" {
  name = "terraform_test"
}
resource "tencentcloud_eip" "eip_test_dnat" {
  name = "terraform_test"
}

resource "tencentcloud_nat_gateway" "my_nat" {
  vpc_id           = "${tencentcloud_vpc.main.id}"
  name             = "terraform_test"
  max_concurrent   = 3000000
  bandwidth        = 500
  assigned_eip_set = [
    "${tencentcloud_eip.eip_dev_dnat.public_ip}",
    "${tencentcloud_eip.eip_test_dnat.public_ip}",
  ]
}
`

// 修改用法配置文件,机智的你一定发现了,这不就是和debug修改后的tf文件一样一样的么
const testAccNatGatewayConfigUpdate = `
resource "tencentcloud_vpc" "main" {
  name       = "terraform test"
  cidr_block = "10.6.0.0/16"
}
resource "tencentcloud_eip" "eip_dev_dnat" {
  name = "terraform_test"
}
resource "tencentcloud_eip" "eip_test_dnat" {
  name = "terraform_test"
}
resource "tencentcloud_eip" "new_eip" {
  name = "terraform_test"
}

resource "tencentcloud_nat_gateway" "my_nat" {
  vpc_id           = "${tencentcloud_vpc.main.id}"
  name             = "new_name"
  max_concurrent   = 10000000
  bandwidth        = 1000
  assigned_eip_set = [
    "${tencentcloud_eip.eip_dev_dnat.public_ip}",
    "${tencentcloud_eip.new_eip.public_ip}",
  ]
}
`
开始测试
export TF_ACC=true
cd tencentcloud
go test -i; go test -test.run TestAccTencentCloudNatGateway_basic -v
我们可以看到,用官方的 testAccProviders,除了自动编译,测试流程也更加标准化,全面覆盖 Create Update Delete,针对同一个资源管理程序,你还可以编写很多更复杂的场景,加入到 Steps,或者分成多个测试用例,这样的测试会更加全面!
写在最后:
目前已经越来越多的云厂商和服务商支持Terraform,为用户提供服务,Terraform也日渐普遍。欢迎关注微信公众号:程序员到架构师,回复Terraform获取更多内容,后续也将继续推送更多有关云计算的文章