很多时候我们可能需要对服务器资源进行保护,通常的做法是在应用层通过鉴权来实现,如果你嫌自己去实现鉴权太麻烦,那就直接让Apache去帮你实现吧!
Apache常见的用户认证可以分为下面三种:
- 基于IP,子网的访问控制(ACL)
- 基本用户验证(Basic Authentication)
- 消息摘要式身份验证(Digest Authentication)
基于IP的访问控制可以通过配置 Allow From实现!这里不多讲。
一般的,我们还会在IP的基础上,再增加一层 Basic Authentication,实现一个基本的服务器用户认证!
1、生成用户名密码文件
/usr/local/apache2/bin/htpasswd -bc users.pwd test hehe1234
Adding password for user test
/usr/local/apache2/bin/htpasswd -b users.pwd test2 hehe4321
Adding password for user test2
cat users.pwd
test:$apr1$4R3foyQ5$1KGHVA5HQL8M9b0K/2UWO0
test2:$apr1$pKLy86CD$W9hFUvs4F06OBXtQhCbPV/
可以看到用户名密码文件已经生成了,一行一个!
2、配置 VirtualHost,如:
<VirtualHost *:80>
    DocumentRoot /usr/local/www/pma/
    DirectoryIndex index.php index.html index.shtml
    ServerName pma.979137.com
    CustomLog "logs/pma.979137.com-access_log" common
    ErrorLog "logs/pma.979137.com-error_log"
    <Directory /usr/local/www/pma/>
        Options Includes FollowSymLinks
        AllowOverride AuthConfig
        AuthName "PMA Contents."
        AuthType basic
        AuthUserFile /usr/local/apache/conf/users.pwd
        Require valid-user
    </Directory>
</VirtualHost>
- AllowOverride 表示通过配置文件进行身份验证
- AuthName 发送给客户端报文头内容:WWW-Authenticate
- AuthType 认证类型
- AuthUserFile 这个就是刚刚生成的用户名密码文件
- Require 指定哪些用户或组才能被授权访问。如:
- require user test test2(只有用户 test 和 test2 可以访问)
- requires groups managers (只有组 managers 中成员可以访问)
- require valid-user (在 AuthUserFile 指定的文件中任何用户都可以访问)
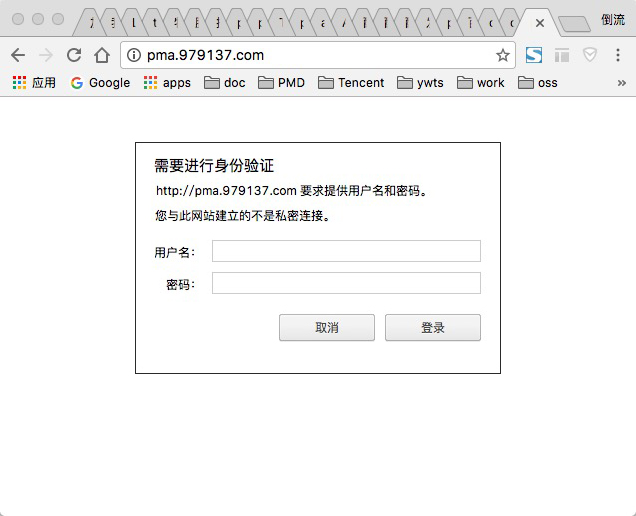
我们来看一下效果:
在浏览器访问:

cURL请求:
curl -v http://pma.979137.com/test.php
* Trying 10.223.28.1...
* Connected to pma.979137.com (10.223.28.1) port 80 (#0)
> GET /test.php HTTP/1.1
> Host: pma.979137.com
> User-Agent: curl/7.43.0
> Accept: */*>
< HTTP/1.1 401 Authorization Required < Date: Fri, 06 Jan 2017 07:02:15 GMT < Server: Apache/2.2.27 (Unix) PHP/5.3.29 < WWW-Authenticate: Basic realm=" PMA Contents." < Content-Length: 490 < Content-Type: text/html; charset=iso-8859-1 < >401 Authorization Required
>Authorization Required
This server could not verify that you
are authorized to access the document
requested. Either you supplied the wrong
credentials (e.g., bad password), or your
browser doesn't understand how to supply
the credentials required.
在没有携带用户名和密码时,HTTP Code 返回了 401,并输出了 Authorization Required!
表示需要该请求需要进行认证!
我们再来看下,携带密码请求:
curl -v -u 'test:hehe1234' 'http://pma.979137.com/test.php'
* Trying 10.223.28.1...
* Connected to pma.979137.com (10.223.28.1) port 80 (#0)
* Server auth using Basic with user 'test'
> GET /test.php HTTP/1.1
> Host: pma.979137.com
> Authorization: Basic c2hpbGlhbmd4aWU6YWl5aTEzMTQ=
> User-Agent: curl/7.43.0
> Accept: */*
>
< HTTP/1.1 200 OK < Date: Fri, 06 Jan 2017 07:14:14 GMT < Server: Apache/2.2.27 (Unix) PHP/5.3.29 < X-Powered-By: PHP/5.3.29 < Content-Length: 25 < Content-Type: text/html < string(11) "hello word!"
HTTP Code 已经是 200 了,并且返回了正确的内容!
至此,一个简单的 Basic 认证就OK了!这种认证一般可用于浏览器访问,也可以用于 API 认证!
