不用OAuth授权,10行代码获取用户微博昵称

这种需求看似奇葩,其实很常见,比如你的应用或网站接入了微博登录,一般会在数据库维护用户绑定的微博唯一ID,但用户的可变信息一般不会存。
然后在一些专题页,用到了用户的微博头像和昵称,这时候如果用OAuth协议,需要先获取授权码,再获取token,再调用户信息接口 ...

如果你觉得太麻烦,那就来试试笔者的方法。笔者的微博:http://weibo.com/1864997710 ,直接cURL:

curl 'http://weibo.com/1864997710' -v

* About to connect() to weibo.com port 80 (#0)
* Trying 123.125.104.197... connected
> GET /1864997710 HTTP/1.1
> User-Agent: curl/7.22.0 (i686-pc-linux-gnu) libcurl/7.22.0 OpenSSL/1.0.1 zlib/1.2.3.4 libidn/1.23 librtmp/2.3
> Host: weibo.com
> Accept: */*
>
< HTTP/1.1 302 Moved Temporarily < Server: WeiBo < Date: Thu, 18 Sep 2014 02:02:22 GMT < Content-Type: text/html; charset=utf-8 < Transfer-Encoding: chunked < Connection: close < Expires: Sat, 26 Jul 1997 05:00:00 GMT < P3P: CP="CURa ADMa DEVa PSAo PSDo OUR BUS UNI PUR INT DEM STA PRE COM NAV OTC NOI DSP COR" < Cache-Control: no-cache, no-store < Pragma: no-cache < Location: http://passport.weibo.com/visitor/visitor?a=enter&url=http%3A%2F%2Fweibo.com%2F1864997710&_rand=1411005742.125 < DPOOL_HEADER: alice97 < Set-Cookie: TC-Page-G0=4e714161a27175839f5a8e7411c8b98c;Path=/ < LB_HEADER: alice27 < * Closing connection #0

看来直接抓取用户主页的形式不靠谱,因为未登录,微博给你重定向了。

庆幸的是,微博还有一个页面,是不需要登录,而且恰好有微博昵称。
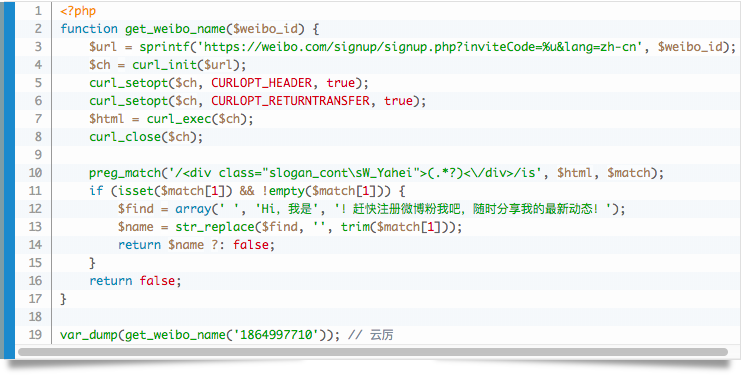
就是访问某人的微博时产生的邀请注册页,页面中会有TA的微博昵称,于是就呵呵了

下面这个函数,可以帮你实现,无需授权无需登录,根据微博ID获取微博昵称

这样做,有什么好处?
1.少写很多OAuth相关代码
2.也降低了多次http的网络消耗
3.实时性(也可以根据需要缓存起来)

【命令】Linux lsof 命令

lsof, LiSt Opened Files, 列出打开的文件, 听起来很简单的样子. 但想*nix中很多其他工具一样, lsof把这件简单的事情做到了炉火纯青. 因为Unix认为”一切皆文件”, 那么”打开的文件”就不仅仅是传统意义上打开的文件了, 还可以是网络/Unix域套接字, 匿名/具名管道, 共享库文件, 目录文件, 设备文件等等. 很多场景下, 查看进程或系统打开的文件会给调试带来极大的帮助. 下面简单地介绍lsof常被使用的功能选项.

lsof : 简单地执行lsof会列出当前系统中所有被打开的文件, 但为了看到完整的信息, 通常需要具有root权限;
lsof -u dutor : 列出用户dutor打开的文件, 可指定多个用户, 默认是OR的关系;
lsof -c tair : 列出名称以tair开头的进程打开的文件, c for command, 可指定多个;
lsof -c /^t.*r$/ : 列出名称以t开头, r结尾的进程打开的文件;
lsof -p 12315 : 列出进程号为12315的进程打开的文件, 可指定多个;
lsof server.log : 列出打开server.log文件的进程, 可指明多个文件;
lsof . : 列出打开当前目录的进程;
lsof +D . : 递归地列出当前目录中被打开的文件, 当然也可以lsof | grep `pwd`;
lsof -i : 列出打开的套接字;
lsof -i tcp : 列出打开的tcp套接字;
lsof -i :5198 : 列出打开5198端口的进程;
lsof -i :ssh : 列出打开22端口的进程;
lsof -i tcp:5198 : 列出打开5198号tcp端口的进程;
lsof -U : 列出打开Unix域套接字的进程;
lsof -d 0-2 : 列出在0到2文件描述符上打开文件的进程;
lsof -d mem : 列出打开映射文件的进程;
lsof -d txt : 列出打开的可执行文件.
还有其他一些非常有用的选项, 可以对lsof的行为进行控制.

lsof -a: 上述功能性选项可以组合使用, 但默认采用OR逻辑列出, -a选项令lsof使用AND逻辑;
lsof -t: 只列出进程号, 可以借此得到特定的进程列表, 以方便对这些进程的自动处理, 比如kill `lsof -t -i :5198`会杀死所有打开5198端口的进程;
lsof -r [seconds]: -r选项可以让lsof以一定的时间间隔连续执行, 在监视文件/进程时会非常实用.

这只是一个实用的不完全选项的罗列, 如果你知道其他非常实用的选项, 还望留言分享之

MySQL中utf8编码:utf8_bin,utf8_general_ci,utf8_unicode_ci的区别

[font=微软雅黑][size=3][b]我们在使用 MySQL 的UTF8编码 时 普遍使用的校对规则都是:[/b][/size][/font]
[url=thread-80-1-1.html]utf8_bin[/url] , [url=thread-80-1-1.html]utf8_general_ci[/url] , [url=thread-80-1-1.html]utf8_general_cs[/url] , [url=thread-80-1-1.html]utf8_unicode_ci[/url]

[table=98%]

utf8_bin compare strings by the binary value of each character in the string 将字符串每个字符串用二进制数据编译存储。
区分大小写,校对规则和 utf8_general_cs 一样,而且可以存二进制的内容 utf8_general_ci 不区分大小写,即 "大小写不敏感",a 和 A 会在字符判断中会被当做一样的,例如:
SELECT * FROM `table` WHERE `field`= 'a'
结果将是 field等于A 和 field等于a 的所有记录集合 utf8_general_cs 区分大小写,例如:
SELECT * FROM `table` WHERE `field`= 'a'
结果只有 field等于a 的记录集合 utf8_unicode_ci 不区分大小写,支持部分Unicode校对规则算法

[font=微软雅黑][size=3][b]举例说明:[/b][/size][/font]
如果你的Sql查询语句: SELECT * FROM `table` WHERE `field`=‘SINA’
下面哪些字段内容会返回匹配:
[table=98%]

'SINA' utf8_bin、utf8_general_ci、utf8_general_cs、utf8_unicode_ci 'Sina' utf8_general_ci、utf8_unicode_ci

[font=微软雅黑][size=3][b]utf8_unicode_ci 与 utf8_general_ci 区别:[/b][/size][/font]

当前,utf8_unicode_ci校对规则仅部分支持Unicode校对规则算法。一些字符还是不能支持。
并且,不能完全支持组合的记号。
这主要影响越南和俄罗斯的一些少数民族语言,如:Udmurt 、Tatar、Bashkir和Mari。

utf8_unicode_ci的最主要的特色是支持扩展,即当把一个字母看作与其它字母组合相等时。例如,在德语和一些其它语言中‘ß’等于‘ss’。
utf8_general_ci是一个遗留的校对规则,不支持扩展。它仅能够在字符之间进行逐个比较。这意味着utf8_general_ci校对规则进行的比较速度很快,但是与使用 utf8_unicode_ci 的校对规则相比,比较正确性较差)。

例如,使用utf8_general_ci和utf8_unicode_ci两种 校对规则下面的比较相等:
Ä = A
Ö = O
Ü = U

两种校对规则之间的区别是,对于utf8_general_ci下面的等式成立:
ß = s

但是,对于utf8_unicode_ci下面等式成立:
ß = ss

对于一种语言仅当使用utf8_unicode_ci排序做的不好时,才执行与具体语言相关的utf8字符集 校对规则。例如,对于德语和法语,utf8_unicode_ci工作的很好,因此不再需要为这两种语言创建特殊的utf8校对规则。

utf8_general_ci也适用与德语和法语,除了‘ß’等于‘s’,而不是‘ss’之外。如果你的应用能够接受这些,那么应该使用utf8_general_ci,因为它速度快。
否则,使用 utf8_unicode_ci,因为它比较准确

ubuntu中Libreoffice汉化方法

libreoffice是一个跨平台的office办公软件,功能强大,文档格式类型兼容Microsoft Office办公套件,通过在ubuntu,xubuntu软件中心安装之后都是英文版本的,如何汉化,能够更加方便的使用呢?

方法很简单,只要安装了两个语言包即可:

libreoffice-l10n-zh-cn
libreoffice-help-zh-cn

直接在软件中心搜索并安装

倒流’s Bolg

mysql的grant命令,对mysql用户权限的增删改查

[size=4][b]本文实例,运行于 MySQL 5.0 及以上版本[/b][/size]
MySQL 赋予用户权限命令的简单格式可概括为:

grant 权限 on 数据库对象 to 用户

[font=微软雅黑][size=5][b][color=SeaGreen]一、grant 普通数据用户,查询、插入、更新、删除 数据库中所有表数据的权利[/b][/size][/font]
[code]grant select on testdb.* to common_user@'%'
grant insert on testdb.* to common_user@'%'
grant update on testdb.* to common_user@'%'
grant delete on testdb.* to common_user@'%'[/code]
或者,用一条 MySQL 命令来替代:
[code]grant select, insert, update, delete on testdb.* to common_user@'%'[/code]

[font=微软雅黑][size=5][b][color=SeaGreen]二、grant 数据库开发人员,创建表、索引、视图、存储过程、函数。。。等权限。[/b][/size][/font]

grant 创建、修改、删除 MySQL 数据表结构权限:
[code]grant create on testdb.* to developer@'192.168.0.%';
grant alter on testdb.* to developer@'192.168.0.%';
grant drop on testdb.* to developer@'192.168.0.%';[/code]

grant 操作 MySQL 外键权限:
[code]grant references on testdb.* to developer@'192.168.0.%';[/code]

grant 操作 MySQL 临时表权限:
[code]grant create temporary tables on testdb.* to developer@'192.168.0.%';[/code]

grant 操作 MySQL 索引权限:
[code]grant index on testdb.* to developer@'192.168.0.%';[/code]

grant 操作 MySQL 视图、查看视图源代码 权限:
[code]grant create view on testdb.* to developer@'192.168.0.%';
grant show view on testdb.* to developer@'192.168.0.%';[/code]

grant 操作 MySQL 存储过程、函数 权限:
[code]grant create routine on testdb.* to developer@'192.168.0.%';
grant alter routine on testdb.* to developer@'192.168.0.%';
grant execute on testdb.* to developer@'192.168.0.%';[/code]

[font=微软雅黑][size=5][b][color=SeaGreen]三、grant 普通 DBA 管理某个 MySQL 数据库的权限。[/b][/size][/font]

[code]grant all privileges on testdb to dba@'localhost'[/code]
其中,关键字 “privileges” 可以省略。

[font=微软雅黑][size=5][b][color=SeaGreen]四、grant 高级 DBA 管理 MySQL 中所有数据库的权限。[/b][/size][/font]

[code]grant all on *.* to dba@'localhost'[/code]

[font=微软雅黑][size=5][b][color=SeaGreen]五、MySQL grant 权限,分别可以作用在多个层次上。[/b][/size][/font]

1. grant 作用在整个 MySQL 服务器上:
dba 可以查询 MySQL 中所有数据库中的表
[code]grant select on *.* to dba@localhost;[/code]
dba 可以管理 MySQL 中的所有数据库
[code]grant all on *.* to dba@localhost;[/code]

2. grant 作用在单个数据库上:
dba 可以查询 testdb 中的表
[code]grant select on testdb.* to dba@localhost;[/code]

3. grant 作用在单个数据表上:
[code]grant select, insert, update, delete on testdb.orders to dba@localhost;[/code]

这里在给一个用户授权多张表时,可以多次执行以上语句。例如:
[code]grant select(user_id,username) on smp.users to mo_user@'%' identified by '123345';
grant select on smp.mo_sms to mo_user@'%' identified by '123345';[/code]

4. grant 作用在表中的列上:
[code]grant select(id, se, rank) on testdb.apache_log to dba@localhost;[/code]

5. grant 作用在存储过程、函数上:
grant execute on procedure testdb.pr_add to 'dba'@'localhost'
grant execute on function testdb.fn_add to 'dba'@'localhost'

[font=微软雅黑][size=5][b][color=SeaGreen]六、查看 MySQL 用户权限[/b][/size][/font]

查看当前用户(自己)权限:
[code]show grants;[/code]
查看其他 MySQL 用户权限:
[code]show grants for dba@localhost;[/code]

[font=微软雅黑][size=5][b][color=SeaGreen]七、撤销已经赋予给 MySQL 用户权限的权限。[/b][/size][/font]

revoke 跟 grant 的语法差不多,只需要把关键字 “to” 换成 “from” 即可:
[code]grant all on *.* to dba@localhost;
revoke all on *.* from dba@localhost;[/code]

[font=微软雅黑][size=5][b][color=SeaGreen]八、MySQL grant、revoke 用户权限注意事项[/b][/size][/font]

1. grant, revoke 用户权限后,该用户只有重新连接 MySQL 数据库,权限才能生效。
2. 如果想让授权的用户,也可以将这些权限 grant 给其他用户,需要选项 “grant option“
[code]grant select on testdb.* to dba@localhost with grant option;[/code]

这个特性一般用不到。实际中,数据库权限最好由 DBA 来统一管理。

修改完用户权限,请执行:(刷新系统权限)[code]flush privileges;[/code]

MySQL无法使用外网IP或内网IP访问 解决办法

ERROR 2003 (HY000): Can't connect to MySQL server on '192.168.209.69' (111)

常见服务器环境场景:
[list]
[*]一台机器两个网卡,一个内网IP,一个外网IP
[*]一台机器只有一个内网IP(服务器集群什么)
[/list]一般我们内网通讯(例如 A机器 访问 B机器 的 Memcache、MySQL 等),都是使用内网IP,原因我就不多说了。
[code]mysql -h 192.168.209.69 -u test -p 123456 -D fuck
ERROR 2003 (HY000): Can't connect to MySQL server on '192.168.209.69' (111)[/code][b]出现上述问题,可能有以下几种可能:[/b]

1、my.cnf 配置文件中 skip-networking 被配置

skip-networking 这个参数,导致所有TCP/IP端口没有被监听,也就是说出了本机,其他客户端都无法用网络连接到本mysql服务器
所以需要把这个参数注释掉。

2、my.cnf 配置文件中 bindaddress 的参数配置

bindaddress,有的版本是bind-address ,这个参数是指定哪些ip地址被配置,使得mysql服务器只回应哪些ip地址的请求,
所以需要把这个参数注释掉。

3、防火墙的原因
通过 /etc/init.d/iptables stop 关闭防火墙

[hr]
如果是下面这种错误:

ERROR 1045 (28000): Access denied for user 'test'@'localhost' (using password: YES)

那必然是用户权限问题,请参考:[url=thread-72-1-1.html]mysql的grant命令,对mysql用户权限的增删改查[/url]

Apache配置文件解析错误和启动失败总结

httpd not running, trying to start
(98)Address already in use: make_sock: could not bind to address 0.0.0.0:80
no listening sockets available, shutting down
Unable to open logs

80端口被占用,尚无可用套接字可以使用,导致apache关闭了。apache觉得,自己很没存在感,最爱的80端口被占用,连个可以说话的sokets都没有,于是apache很郁闷地选择了关闭。解决办法是,先把占用80端口的进程给揪出来,干掉它!

关于怎么找的问题:1.如果是windows平台,使用这条:netstat -aon|findstr "80",可以找到进程ID,直接杀掉;
2.如果linux平台,使用:lsof -i:80 ,看到pid没?不要犹豫,杀掉。
3.如果是unix,那像得网上再找办法啦··
-----

service httpd restart 再试试,看是不是能正常启动,Good Luck!


Invalid command 'Order', perhaps misspelled or defined by a module not included in the server configuration

这个错误是是没有加载 mod_authz_host.so 导致的,添加进去就行了
[code lang="shell"]LoadModule authz_host_module modules/mod_authz_host.so[/code]


Invalid command 'AddLanguage', perhaps misspelled or defined by a module not included in the server configuration


sudo apachectl restart

apache未启动,也没有报错,

等待更新....

PHP一行代码获取目录及子目录下所有文件名

常用方法一:读取文件目录
<?php
$dir = "file";
if (is_dir($dir)) { 
   if ($dh = opendir($dir)) {
       while (($file = readdir($dh)) !== false) {
            if ($file!="." && $file!="..") {
                echo "<a href=file/".$file.">".$file."</a><br>";
            }
       }
       closedir($dh);
   }
}
常用方法二:glob方法
<?php
$dirs = glob($tPath . '/*');
    foreach ($dirs as $path) {
        if (is_dir($path)) {
            $path = basename($path);
            $dirs_arr[] = $path;
        }
    }
}
其实一行代码就可以
<?php
$dirs = array_map('basename', glob ('*', GLOB_ONLYDIR))

linux下杀死进程的N种方法

[font=微软雅黑][size=4][b][color=SeaGreen]常规篇:[/b][/size][/font]

 首先,用ps查看进程,方法如下:

[code]ps -ef[/code]

……
smx 1822 1 0 11:38 ? 00:00:49 gnome-terminal
smx 1823 1822 0 11:38 ? 00:00:00 gnome-pty-helper
smx 1824 1822 0 11:38 pts/0 00:00:02 bash
smx 1827 1 4 11:38 ? 00:26:28 /usr/lib/firefox-3.6.18/firefox-bin
smx 1857 1822 0 11:38 pts/1 00:00:00 bash
smx 1880 1619 0 11:38 ? 00:00:00 update-notifier
……
smx 11946 1824 0 21:41 pts/0 00:00:00 ps -ef

或者:
[code]ps -aux[/code]

……
smx 1822 0.1 0.8 58484 18152 ? Sl 11:38 0:49 gnome-terminal
smx 1823 0.0 0.0 1988 712 ? S 11:38 0:00 gnome-pty-helper
smx 1824 0.0 0.1 6820 3776 pts/0 Ss 11:38 0:02 bash
smx 1827 4.3 5.8 398196 119568 ? Sl 11:38 26:13 /usr/lib/firefox-3.6.18/firefox-bin
smx 1857 0.0 0.1 6688 3644 pts/1 Ss 11:38 0:00 bash
smx 1880 0.0 0.6 41536 12620 ? S 11:38 0:00 update-notifier
……
smx 11953 0.0 0.0 2716 1064 pts/0 R+ 21:42 0:00 ps -aux

此时如果我想杀了火狐的进程就在终端输入:
[code]kill -s 9 1827[/code]

其中-s 9 制定了传递给进程的信号是9,即强制、尽快终止进程。各个终止信号及其作用见附录。

1827则是上面ps查到的火狐的PID。

简单吧,但有个问题,进程少了则无所谓,进程多了,就会觉得痛苦了,
无论是ps -ef 还是ps -aux,每次都要在一大串进程信息里面查找到要杀的进程,看的眼都花了。

[font=微软雅黑][size=4][b][color=SeaGreen]改进1:[/b][/size][/font]

把ps的查询结果通过管道给grep查找包含特定字符串的进程。管道符“|”用来隔开两个命令,管道符左边命令的输出会作为管道符右边命令的输入。

[code]ps -ef | grep firefox[/code]

smx 1827 1 4 11:38 ? 00:27:33 /usr/lib/firefox-3.6.18/firefox-bin
smx 12029 1824 0 21:54 pts/0 00:00:00 grep --color=auto firefox

这次就清爽了。然后就是
[code]kill -s 9 1827[/code]

还是嫌打字多?

[font=微软雅黑][size=4][b][color=SeaGreen]改进2 ———使用pgrep:[/b][/size][/font]

一看到pgrep首先会想到什么?没错,grep!pgrep的p表明了这个命令是专门用于进程查询的grep。

[code]pgrep firefox[/code]

1827

看到了什么?没错火狐的PID,接下来又要打字了:
[code]kill -s 9 1827[/code]

[font=微软雅黑][size=4][b][color=SeaGreen]改进3 ——使用pidof:[/b][/size][/font]

看到pidof想到啥?没错pid of xx,字面翻译过来就是 xx的PID。

[code]pidof firefox-bin[/code]

1827

和pgrep相比稍显不足的是,pidof必须给出进程的全名。然后就是老生常谈:
[code]kill -s 9 1827[/code]

无论使用ps 然后慢慢查找进程PID
还是用grep查找包含相应字符串的进程,
亦或者用pgrep直接查找包含相应字符串的进程PID,然后手动输入给kill杀掉,都稍显麻烦。
有没有更方便的方法?有!

[font=微软雅黑][size=4][b][color=SeaGreen]改进4:[/b][/size][/font]
[code]ps -ef | grep firefox | grep -v grep | cut -c 9-15 | xargs kill -s 9[/code]

说明:

“grep firefox”的输出结果是,所有含有关键字“firefox”的进程。
“grep -v grep”是在列出的进程中去除含有关键字“grep”的进程。
“cut -c 9-15”是截取输入行的第9个字符到第15个字符,而这正好是进程号PID。
“xargs kill -s 9”中的xargs命令是用来把前面命令的输出结果(PID)作为“kill -s 9”命令的参数,并执行该命令。“kill -s 9”会强行杀掉指定进程。

难道你不想抱怨点什么?没错太长了

[font=微软雅黑][size=4][b][color=SeaGreen]改进5:[/b][/size][/font]

知道pgrep和pidof两个命令,干嘛还要打那么长一串!
[code]pgrep firefox | xargs kill -s 9[/code]

[font=微软雅黑][size=4][b][color=SeaGreen]改进6:[/b][/size][/font]
[code]ps -ef | grep firefox | awk '{print $2}' | xargs kill -9[/code]

kill: No such process

有一个比较郁闷的地方,进程已经正确找到并且终止了,但是执行完却提示找不到进程。

其中awk '{print $2}' 的作用就是打印(print)出第二列的内容。根据常规篇,可以知道ps输出的第二列正好是PID。就把进程相应的PID通过xargs传递给kill作参数,杀掉对应的进程。

[font=微软雅黑][size=4][b][color=SeaGreen]改进7:[/b][/size][/font]
难道每次都要调用xargs把PID传递给kill?答案是否定的:
[code]kill -s 9 `ps -aux | grep firefox | awk '{print $2}'`[/code]

[font=微软雅黑][size=4][b][color=SeaGreen]改进8:[/b][/size][/font]

没错,命令依然有点长,换成pgrep。
[code]kill -s 9 `pgrep firefox`[/code]

[font=微软雅黑][size=4][b][color=SeaGreen]改进9——pkill:[/b][/size][/font]

看到pkill想到了什么?没错pgrep和kill!pkill=pgrep+kill。
[code]pkill -9 firefox[/code]

说明:"-9" 即发送的信号是9,pkill与kill在这点的差别是:pkill无须 “s”,终止信号等级直接跟在 “-“ 后面。之前我一直以为是 "-s 9",结果每次运行都无法终止进程。

[font=微软雅黑][size=4][b][color=SeaGreen]改进10——killall:[/b][/size][/font]

killall和pkill是相似的,不过如果给出的进程名不完整,killall会报错。pkill或者pgrep只要给出进程名的一部分就可以终止进程。
[code]killall -9 firefox[/code]

附录:各种信号及其用途
[table=100%]

Signal Description Signal number on Linux x86[1] SIGABRT Process aborted 6 SIGALRM Signal raised by alarm 14 SIGBUS Bus error: "access to undefined portion of memory object" 7 SIGCHLD Child process terminated, stopped (or continued*) 17 SIGCONT Continue if stopped 18 SIGFPE Floating point exception: "erroneous arithmetic operation" 8 SIGHUP Hangup 1 SIGILL Illegal instruction 4 SIGINT Interrupt 2 SIGKILL Kill (terminate immediately) 9 SIGPIPE Write to pipe with no one reading 13 SIGQUIT Quit and dump core 3 SIGSEGV Segmentation violation 11 SIGSTOP Stop executing temporarily 19 SIGTERM Termination (request to terminate) 15 SIGTSTP Terminal stop signal 20 SIGTTIN Background process attempting to read from tty ("in") 21

SIGTTOU Background process attempting to write to tty ("out") 22

SIGUSR1 User-defined 1 10

SIGUSR2 User-defined 2 12

SIGPOLL Pollable event 29

SIGPROF Profiling timer expired 27

SIGSYS Bad syscall 31

SIGTRAP Trace/breakpoint trap 5

SIGURG Urgent data available on socket 23

SIGVTALRM Signal raised by timer counting virtual time: "virtual timer expired" 26

SIGXCPU CPU time limit exceeded 24

SIGXFSZ File size limit exceeded 25

MySQL备份工具 mysqldump 的基本用法

基本格式:
mysqldump [OPTIONS] database [tables]

如果你不给定任何表,整个数据库将被导出。
通过执行mysqldump --help,你能得到你[url=thread-63-1-1.html]mysqldump[/url]的版本支持的选项表。

注意,如果你运行mysqldump没有--quick或--opt选项,[url=thread-63-1-1.html]mysqldump[/url]将在导出结果前装载整个结果集到内存中,如果你正在导出一个大的数据库,这将可能是一个问题。

[url=thread-63-1-1.html]mysqldump[/url]支持下列选项:
--add-locks
在每个表导出之前增加LOCK TABLES并且之后UNLOCK TABLE。(为了使得更快地插入到MySQL)。
--add-drop-table
在每个create语句之前增加一个drop table。
--allow-keywords
允许创建是关键词的列名字。这由表名前缀于每个列名做到。
-c, --complete-insert
使用完整的insert语句(用列名字)。
-C, --compress
如果客户和服务器均支持压缩,压缩两者间所有的信息。
--delayed
用INSERT DELAYED命令插入行。
-e, --extended-insert
使用全新多行INSERT语法。(给出更紧缩并且更快的插入语句)
-#, --debug[=option_string]
跟踪程序的使用(为了调试)。
--help
显示一条帮助消息并且退出。
--fields-terminated-by=...
--fields-enclosed-by=...
--fields-optionally-enclosed-by=...
--fields-escaped-by=...
--fields-terminated-by=...
这些选择与-T选择一起使用,并且有相应的LOAD DATA INFILE子句相同的含义。
LOAD DATA INFILE语法。
-F, --flush-logs
在开始导出前,洗掉在MySQL服务器中的日志文件。
-f, --force,
即使我们在一个表导出期间得到一个SQL错误,继续。
-h, --host=..
从命名的主机上的MySQL服务器导出数据。缺省主机是localhost。
-l, --lock-tables.
为开始导出锁定所有表。
-t, --no-create-info
不写入表创建信息(CREATE TABLE语句)
-d, --no-data
不写入表的任何行信息。如果你只想得到一个表的结构的导出,这是很有用的!
--opt
同--quick --add-drop-table --add-locks --extended-insert --lock-tables。
应该给你为读入一个MySQL服务器的尽可能最快的导出。
-pyour_pass, --password[=your_pass]
与服务器连接时使用的口令。如果你不指定“=your_pass”部分,[url=thread-63-1-1.html]mysqldump[/url]需要来自终端的口令。
-P port_num, --port=port_num
与一台主机连接时使用的TCP/IP端口号。(这用于连接到localhost以外的主机,因为它使用 Unix套接字。)
-q, --quick
不缓冲查询,直接导出至stdout;使用mysql_use_result()做它。
-S /path/to/socket, --socket=/path/to/socket
与localhost连接时(它是缺省主机)使用的套接字文件。
-T, --tab=path-to-some-directory
对于每个给定的表,创建一个table_name.sql文件,它包含SQL CREATE 命令,和一个table_name.txt文件,它包含数据。 注意:这只有在[url=thread-63-1-1.html]mysqldump[/url]运行在mysqld守护进程运行的同一台机器上的时候才工作。.txt文件的格式根据--fields-xxx和--lines--xxx选项来定。
-u user_name, --user=user_name
与服务器连接时,MySQL使用的用户名。缺省值是你的Unix登录名。
-O var=option, --set-variable var=option设置一个变量的值。可能的变量被列在下面。
-v, --verbose
冗长模式。打印出程序所做的更多的信息。
-V, --version
打印版本信息并且退出。
-w, --where='where-condition'
只导出被选择了的记录;注意引号是强制的!
"--where=user='jimf'" "-wuserid>1" "-wuserid<1" 最常见的[url=thread-63-1-1.html]mysqldump[/url]使用可能制作整个数据库的一个备份: [url=thread-63-1-1.html]mysqldump[/url] --opt database > backup-file.sql
但是它对用来自于一个数据库的信息充实另外一个MySQL数据库也是有用的:
mysqldump --opt database | mysql --host=remote-host -C database
由于[url=thread-63-1-1.html]mysqldump[/url]导出的是完整的SQL语句,所以用mysql客户程序很容易就能把数据导入了:
shell> mysqladmin create target_db_name
shell> mysql target_db_name < backup-file.sql 就是 shell> mysql 库名 < 文件名 ================================ 几个常用用例: 1.导出整个数据库 mysqldump -u 用户名 -p 数据库名 > 导出的文件名
mysqldump -u wcnc -p smgp_apps_wcnc > wcnc.sql

2.导出一个表
mysqldump -u 用户名 -p 数据库名 表名> 导出的文件名
mysqldump -u wcnc -p smgp_apps_wcnc users> wcnc_users.sql

3.导出一个数据库结构
mysqldump -u wcnc -p -d --add-drop-table smgp_apps_wcnc >d:\wcnc_db.sql
-d 没有数据 --add-drop-table 在每个create语句之前增加一个drop table

4.导入数据库
常用source 命令
进入mysql数据库控制台,
如mysql -u root -p

mysql>use 数据库
然后使用source命令,后面参数为脚本文件(如这里用到的.sql)
mysql>source d:\wcnc_db.sql

微信公众号:程序员到架构师

最新文章

Return Top